1 Welcome
Welcome to the FlowWright multitenant configuration user guide. This guide describes how to configure and use FlowWright and its features within a multitenant environment.
FlowWright multitenant architecture and configuration let you serve multiple tenants/customers using 1 copy of FlowWright software.

2 Configuration
The v9.x FlowWright installer will let you select the installation type as shown below:

If you select “Multi-Tenant Installation”, FlowWright will be installed with the property multi-tenant configuration.
In case you installed as “Standard Installation”, you can still make it a multi-tenant environment by following the below-shown steps. Navigate to the following directory:
C:\inetpub\wwwroot\cDevWorkflow\bin
Locate and open the file “appSettings.config” using notepad or any other text editor. The file contents should look like as follows:

In the above configuration settings, change the “isMultiTenant” value to “true”. As shown below:

Once the above change is completed and the file is saved, now you have access to the FlowWright Tenant manager.
3 Tenant Manager
The FlowWright tenant manager lets you manage tenants within your FlowWright configuration. The tenant manager can be accessed using the following URL:
http://tenantmanager.localhost/cDevWorkflow
The following login page will be displayed to login to the tenant manager:

Log in to the tenant manager using the following default credentials:
After a successful login, the tenant manager UI will look as follows:

The tenant manager considers the FlowWright database as the master tenant.
3.1 Create a new tenant database
To define a tenant, a tenant database must be created. A blank database can be created within the SQL server using SQL Enterprise Manager or any other database management tool. You can also create a new database using the following UI:

Once the dialog is displayed, give a name for the new database, in this case, let’s call it “FlowWrightTenant1”.

Click the “Create” button to create the new database. If successful, the database will be created within the same database server as the current FlowWright database. If you like to the database in a different database server, then use the option “Connection String” to provide a different connection string to another server.
If you like you can check and verify within SQL server to make sure the new database “FlowWrightTenant1” was created.
Note: The new tenant should also create the forms master script file. Navigate to C:\inetpub\wwwroot\cDevWorkflow\Tenants\GUID\js\formEvents to locate 'formWidget.js' file.
The next operation is to add the proper tenant tables and data to this newly created database. Use the following menu option:

Once the dialog is displayed, enter the database name as “FlowWrightTenant1” and select “Template” as the selection for where will replicate tables and data from.

Click the “Create” button to set up the new database with tables and configuration data. Once this operation is successful, the database should contain tables and configuration data.
If you like, you can verify the database tables and their data using a database management tool such as SQL Enterprise manager.
3.2 Configuration of a new tenant
Now that a new tenant database is created, a new tenant can be configured. Use the following menu option:

The following dialog will be displayed:

For the name of the tenant, let’s enter “tenant1”. As you can see the URL automatically adjusted to reflect the new tenant URL. Next is to define and connection string to the tenant database. Let’s do this using the “Connection string builder”.

As you can see above we have provided the connection information to the database server and the tenant database. In this case, we will be using SQL server authentication, we have also provided the SQL username and password. Click the “Test” button to test the connection to the new tenant database “FlowWrightTenant1”.
If the connection is successful, then click the “Generate” button to generate the connection string. Click the “Create” button to create the tenant configuration, as shown below:


Once the tenant is created, it should look as shown above. Now the tenant is ready, and you can log in to the tenant. Access the tenant using the tenant URL, URL for the new tenant is:
http://tenant1.localhost/cDevWorkflow
The tenant1 login screen should look as follows:

Use the default login credentials to log in to tenant1:
Once you log in, the FlowWright UI should be the same as the existing FlowWright UI. Refer to the “FlowWright Configuration Manager User Manual” on how to use this user interface and FlowWright features.
3.3 Edit tenant information
Existing tenant information can be changed using the edit menu as shown below:

Use the following edit dialog to modify the tenant information:

Click the “Update” button to update the newly entered information for the tenant.
3.4 Rename tenant
Rename an existing tenant using the following menu option and the dialog:


3.5 Copy tenant configuration
Existing tenant’s information can be copied to a new tenant using the following menu and dialog:


The newly copied tenant “dev2” will appear in the list as shown below:

3.6 Remove tenant
A tenant can be removed using the following menu and dialog:


Click the “Remove” button to remove the configuration information for the selected tenant.
3.7 Navigating to a tenant
Use the “Launch” menu option to navigate to the tenant.

3.8 Test tenant
Test the tenant connectivity using the following menu option:

The test functionality will test the database connectivity for the tenant is still valid.
3.9 Deactivate/Activate tenant
A tenant can be made inactive or active using the following menu option:

Once the tenant is deactivated, the user cannot log in to the tenant. Any user that navigates to the tenant URL will be displayed the following UI:

3.10 Tenant logo management
Tenant logos can be managed using the following menu options:

There are 2 kinds of logos being used, a large size one for the login screen and a small size one for the application logo.
3.11 Creating a tenant database based on an existing tenant
A new tenant database can be created based on an existing tenant database. In most multitenant configurations, the first tenant is configured and then used as a template for others.
First, create a new database and select the following menu option:

Use the following dialog to select an existing tenant:

Select the option “Existing Tenant” and click the “Create” button to replicate the tables and configuration data to the new tenant database.
3.12 Change the URL for all tenants
If the application URL was changed, all tenant URLs can be changed using the following menu option:

3.13 Reset tenant “admin” user password
Administrator password for a given tenant can be reset using the following menu:

If the “admin” user doesn’t exist within the tenant, it will create the user.
4 Configuration
Configuration section of Tenant manager includes the same items that are there within the Configuration Management section of FlowWright, building blocks or components required to build workflows, forms, and other functionality with the product. Configuration items include the following items:
- Steps
- Step Categories
- Data Types
- Business Objects
- Form Widgets
- Form Widget Categories
- Dashboard Widgets
- Dashboard Widget Categories
- Event Handlers
- Microservices
- DFS Connectors
Management of the above items is documented within the FlowWright Configuration Manager documentation. Within the Tenant manager, there is enhanced functionality within each of the above items that are specific to tenant management. Each item has a new menu called “MultiTenant” that included tenant operations specific to each item type.

In a multi-tenant environment, configuration items should be auto-detected and configured within the tenant manager, then pushed to other tenants. The “MultiTenant” menu is available to all items shown on the above list, they perform the same functionality against selected or all tenants.
5 Step Configuration
5.1 Deploying a step to selected tenants
Navigate to the Steps page under configuration and selected “MultiTenant” menu option:

Using the above-shown menu, steps can be deployed to “All” or “Selected” tenants. If you select “Selected Tenant” the following dialog is shown:

Select all tenants or specific tenants from the drop-down list:

Click the “Select” button to deploy the selected step to selected tenants.
5.2 Deploying a step to All tenants
A selected step can be deployed to all tenants using the “MultiTenant” menu:

Click the “OK” button on the next dialog to deploy to all tenants:

5.3 View tenants that contain the step
A step could belong to any # of tenants, tenants the step belongs to can be viewed using the following menu item:

Below is a list of tenants the step belongs to:

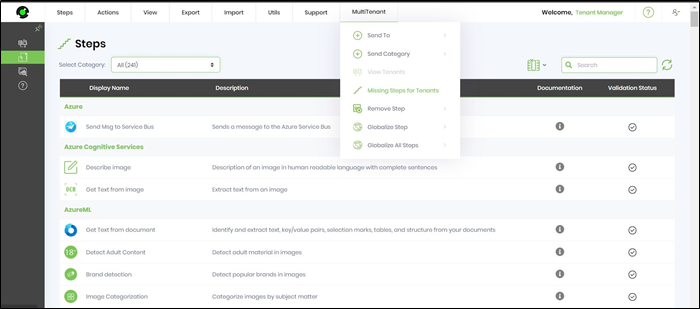
5.3B View tenants that contain missing steps
In the new version 9.10, the tenant manager can identify the missing steps and configure the same by using the new feature. Select "MultiTenant -> Missing Steps for Tenants" menu option as shown below.
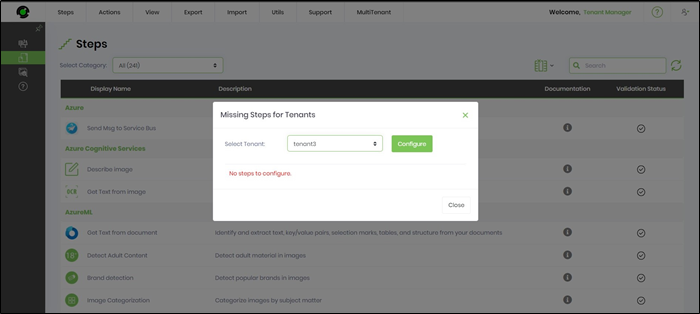
Select the Tenant from the drop-down list. The new feature verifies for the missing steps in the Tenant and notifies if any as shown below. There were no steps to configure in the example below.
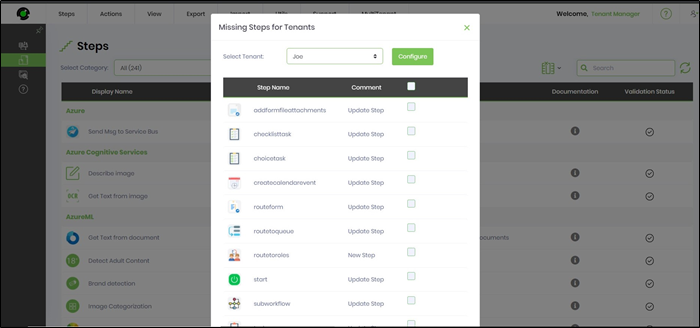
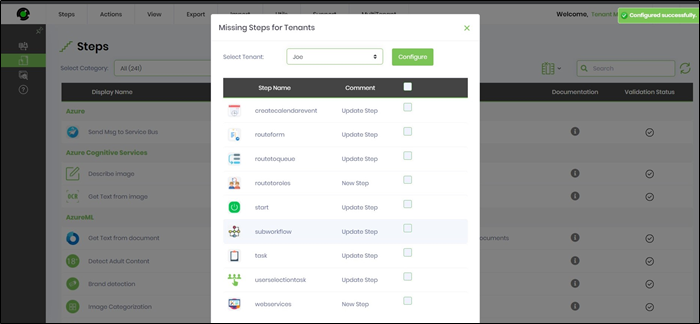
The missing steps for the selected Tenant is listed as a table. Mark the check box to select all or cherry-pick the desired step. Click on Configure to confirm the action. The steps are configured in the Tenant successfully as shown below.
5.4 Remove step from tenants
A step can be removed from selected tenants or all tenants using the following menu:

Select the appropriate menu option to remove the step, the following dialog will be displayed:

5.5 Globalize step
A step has globalization data for different languages. This data is used within the workflow designer to display designer step information using different languages. Globalization data for the step can be updated using the following menu option:

5.6 Globalize all steps
All steps can be globalized across all or selected tenants using the following menu options:

5.7 Pushing step configuration to tenants
Steps properties can be modified, including step inputs and return. These changes can be pushed to all or selected tenants. First, edit the selected step, as shown below:

Once the step properties are modified, use the “MultiTenant” button to push the changes to the tenants.

Changes to step inputs can be also pushed to selected or all tenants using the “MultiTenant” button.

Change to step returns can be also pushed to selected or all tenants using the “MultiTenant” button.

6 Microservices
Microservices can be defined by any user within any tenant using the FlowWright Configuration Manager user interface. In a multitenant environment, only the tenant manager can compile and build the Microservice APIs for each tenant.
Navigate to the Configuration -> Microservices menu, the following user interface will be displayed:

For each tenant, it will display the tenant ID, host name, # of microservices, a link to the build log, and link to view the microservice API. To build the API for selected or all tenants, select the following menu option:

7 Status
The status screen displays vital information about FlowWright and also provides some of the configurations and upgrade features.
7.1 Licensing
For FlowWright to function in a multi-tenant environment, FlowWright requires a multi-tenant license:

As shown on the above graphic, the license type is set to “Multitenant” and also holds value for # of licensed active tenants. FlowWright can be configured with any # of tenants, as long as there 20 active tenants, licensing will be valid.
7.2 Service Status
The service status UI displays the status of the FlowWright engines.

v9.7 includes 7 engine services, if the Windows account used for hosting the application UI has access to start/stop Windows services, then the engines can be started and stopped using the FlowWright user interface. These engine services can be stared/stopped using Windows service management console.
7.3 Email Settings
Email server information can be configured at the tenant manager level and pushed to selected or all tenants. Each of the tenants can also have their configuration for email server settings.

7.4 Settings configuration
Settings such as engine settings are controlled through the Tenant manager, these are global settings that apply to all tenants.

Global settings that apply to all tenant, such as engine configuration settings can be set through the above-shown tenant manager settings screen. Individual settings at the tenant level can be managed within each tenant.
7.5 Distributed Environment
If the current server participates in a distributed/load-balanced environment, then the server can be enabled to participate using the following user interface.

7.6 Distributed File Synchronization
Distributed environments can be configured to synchronize files across systems. This feature can be configured using the following user interface.

7.7 Version Information
The version information display FlowWright version, history, and if a new version of the software is available to download.

7.8 Version Upgrades
Version upgrades are enhanced to upgrade the tenant manager and also tenants. Navigate to the upgrade menu:

Version changes can be viewed for each of the tenants and can be applied using the following screen:

Version changes can be also applied to all or selected tenants using the following screen:

Version upgrades perform now tracks history, history can be viewed using the following menu:


8 User Management
Using the below UI, users for the tenant manager can be managed. Users defined here are only tenant managers ONLY and will have access to only the tenant manager UI, not to any of the tenants.

Once logged in, the U top header will not display the user name, it will display “Tenant Manager”.
9 System Log
FlowWright provides a system log at the tenant manager level and at each tenant. The tenant manager system log will display any error and informational messages generated by the tenant manager user interface and functions.

10 File Manager
FlowWright file manager for the application server is available within the tenant manager. The file manager gives access to the full file system of FlowWright, including each individual tenants, and their folders and files.

11 Help
The help section provides all FlowWright help materials including documentation.
