This Document will illustrate how to write a new simple Form Widget, configure it using the Manage Form Widget, use the widget within the forms designer, and render it within a form instance.
Form Widgets
Following is the list of standard Form Widgets (HTML controls) used within the forms designer:
- Button
- Input
- Select
- Checkbox
- Radio button
- Table
- Image
- Label
- Hr
- File
- iFrame
Custom Form Widgets
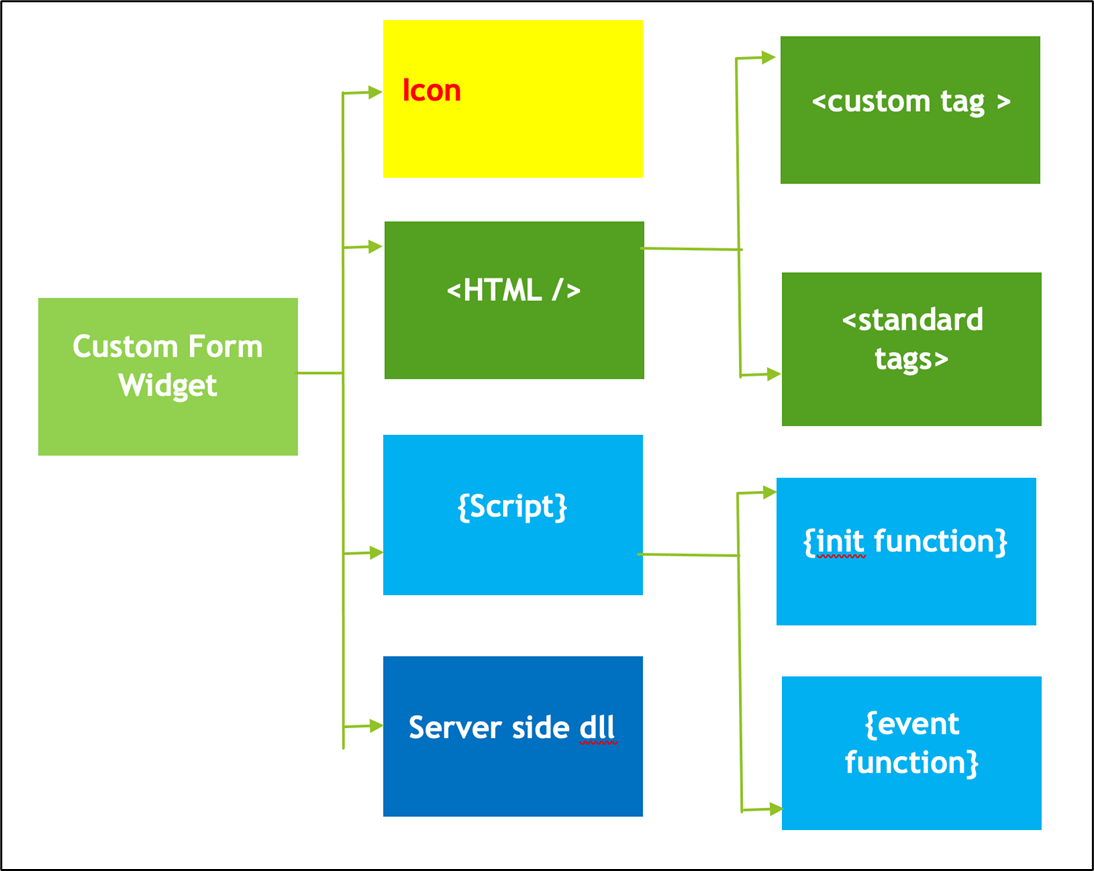
Custom Form Widget combines single or multiple HTML controls, providing UI functionality. A Form Widget consists of these components:
- HTML section
- Script section
- Server side dll
- Icon file
- Configure Form Widget
How to build the custom Form Widget
First, create the empty HTML file with a Widget name. For example, create a widget such as ‘sum’ where the name of the HTML file should be ‘sum.html’.
The basic structure of Form Widget should be as follows
1. Html Section
The basic structure of HTML should be as follows
- Make sure to have UI Start and End comments; the comment section should be enclosed with
<!-- --> tag.
- After the first comment tag, the first custom tag must be <formWidget … > … </formWidget>
- By default, <formWidget> should have two attributes: ID and type. User can add other attributes as per their requirements.
- <formWidget> id must be id="formWidget_form, " the unique id used across all the custom Form Widgets within the application.
- <formWidget> type must have the same name as the HTML file name. For example, we use sum.html, so the type="sum."
- <div> tag must be followed by <formWidget> tag, and all the style="…" attribute properties should be used within this <div> tag. However, the style="…" attribute should not be added within the <formWidget> tag.
HTML controls, ID, and other attributes within the main div tag
- Inside the <div> tag, the user can create their HTML structure.
- Use input and standard control despite of form and submit tag within main <div> mentioned on page 1,
- Use div and span tags for layout design.
- Bootstrap style library is also provided for layout design so users can use Bootstrap classes for div, span, and HTML controls.
Element IDs inside the form widget
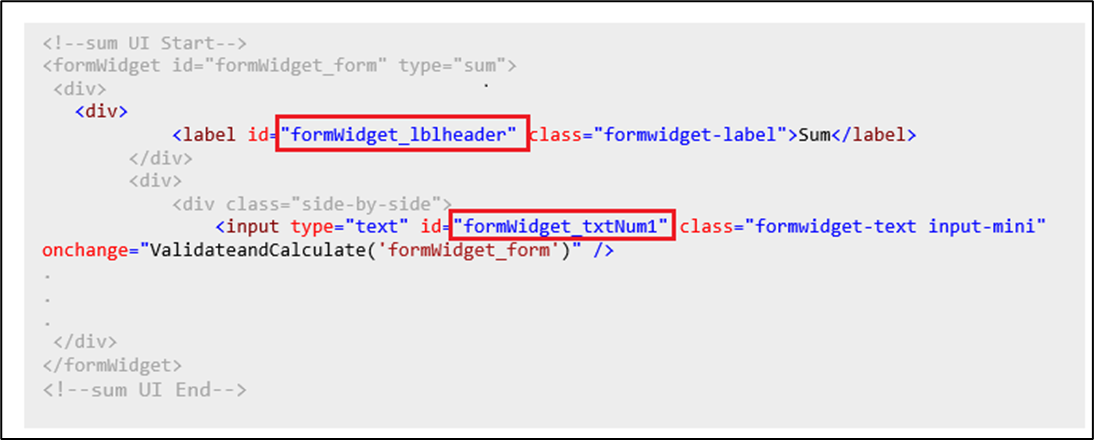
- All HTML element IDs within the Form Widget should be prefixed with id="formWidget_..." followed by the user-defined name. Only alphanumeric and “_” characters are allowed in the ID.
example 1 –
If a Widget has a Label control and the user wants to use the ID as "leader," the ID inside the formWidget control must be prefixed with "formWidget_..." so that the ID would be "formWidget_lblheader."This ID should be unique within the same widget control.
example 2 –
If a Widget contains another text control and the user wants to use ID "txtNum1" inside the formWidget, the control must be prefixed with "formWidget_...", as shown in example 1. Now, the ID would be "formWidget_ txtNum1," and this ID should be unique in the same widget.
The following code contains highlighted sample element IDs from the Form widget, as explained in the examples.
Event handlers for form widget controls
- Use any valid JavaScript event in the HTML element.
- The event calling function must exist in the JavaScript section of the same form widget HTML
Example 1 -
There is a “ValidateandCalculate” function written in the JavaScript section. The user wants to call the onchange="ValidateandCalculate('#formWidget_form') " event from the textbox and access multiple elements in JavaScript, allowing the user to send either the formWidget id 'formWidget_form' or 'formWidget_form' as a parameter. This way, the User can access all child elements from the form widget. If the user wants to access only a component in JavaScript from formWidget, the user can send ‘this’ or formWidgetid 'formWidget_txtNum1' as a parameter.
2. JavaScript Section
The basic structure of JavaScript should be as follows.
Type of Functions from formWidget JavaScript Section.
- UThe user can add two types of functions as follows
-
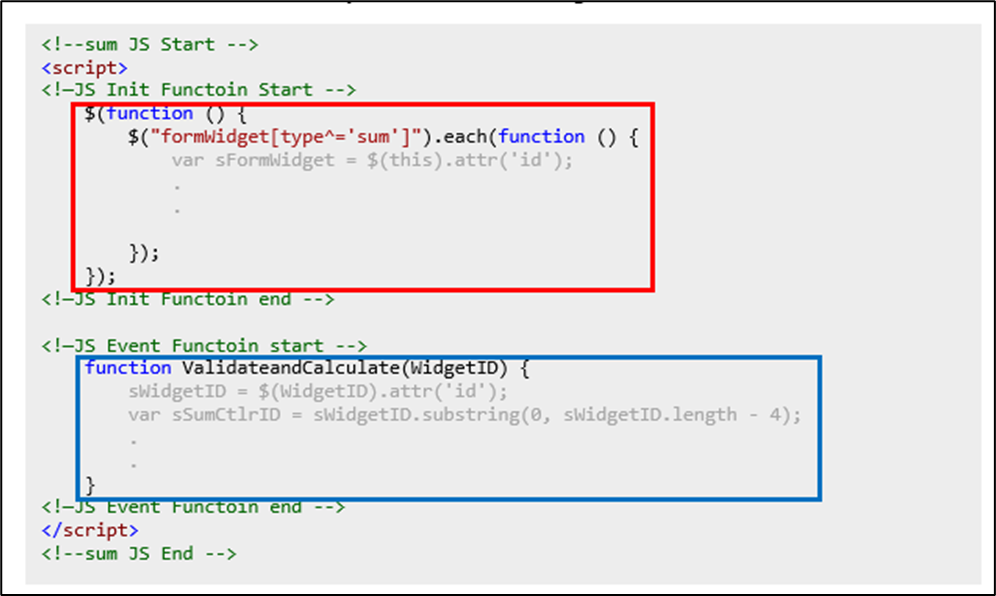
Init Function-
- The init function means initializing a function, which will work only on page load.
- The Init function is shown in the above code and highlighted in the red box.
- Init function must be written within $(function () {. . .});
- Init function must be start with $("formWidget[type^='sum']").each(function () { . . . .});
- In this function, the type must be the form widget type mentioned in the HTML section. In this example, we have mentioned formWidget type as ‘sum,’ so we are using the same in function "…[type^='sum']"
- We can get the formWidget object using $(this). Once we get the object, we can use it for further operations
-
Init Function-
-
Event Handler Function -
- Add any valid function that can be called from HTML controls, as shown in the above code, highlighted in the blue box.
- Write a simple or parameterized function
- Parameters may be any control ID or form widget ID, as discussed earlier
- If the form widget ID is used as a parameter, then the user can get all the controls within the formWidget
Form Widget Example
<!--sum UI Start-->

<formWidget id="formWidget_form" type="sum">

         <div>

             <div>

            <label id="formWidget_lblheader" class="formwidget-label">Sum</label>

             </div>

             <div>

            <div class="side-by-side">

                <input type="text" id="formWidget_txtNum1" class="formwidget-text input-mini" onchange="ValidateandCalculate('#formWidget_form')" /> + <br />

                <label id="formWidget_lblNum2" class="formwidget-sub-label">Number1</label>

            </div>

            <div class="side-by-side">

                <input type="text" id="formWidget_txtNum2" class="formwidget-text input-mini" onchange="ValidateandCalculate('#formWidget_form')" /> = <br />

                <label id="formWidget_lblNum2" class="formwidget-sub-label">Number2</label>

            </div>

            <div class="side-by-side">

                <input type="text" id="formWidget_txtTotal" class="formwidget-text input-mini" onchange="ValidateandCalculate('#formWidget_form')" /> <br />

                <label id="formWidget_lblTotal" class="formwidget-sub-label">Total</label>

            </div>

             </div>

             <div>

            <label id="formWidget_lblErrorMsg" class="failure"></label>

             </div>

         </div>


</formWidget>

<!--sum UI End-->

<!--sum JS Start -->

<script>

         $(function () {

             $("formWidget[type^='sum']").each(function () {

            var sFormWidget = $(this).attr('id');

            var sSumCtlrID = sFormWidget.substring(0, sFormWidget.length - 4);


            var Num1 = '#' + sSumCtlrID + 'txtNum1';

            var Num2 = '#' + sSumCtlrID + 'txtNum2';

            var Total = '#' + sSumCtlrID + 'txtTotal';


            $(Num1).val() == "" ? $(Num1).val("0") : $(Num1).val($(Num1).val());

            $(Num2).val() == "" ? $(Num2).val("0") : $(Num2).val($(Num2).val());

            $(Total).val() == "" ? $(Total).val("0") : $(Total).val($(Total).val());

             });

         });


         function ValidateandCalculate(WidgetID) {

             sWidgetID = $(WidgetID).attr('id');

             var sSumCtlrID = sWidgetID.substring(0, sWidgetID.length - 4);

             var Num1 = $('#' + sSumCtlrID + 'txtNum1').val();

             var Num2 = $('#' + sSumCtlrID + 'txtNum2').val();

             var Total = '#' + sSumCtlrID + 'txtTotal';

             var errorMsg = '#' + sSumCtlrID + 'lblErrorMsg';

             if ($.isNumeric(Num1) && $.isNumeric(Num2)) {

            $(Total).val(parseInt(Num1) + parseInt(Num2));

             } else {

            $(errorMsg).text('Please Enter a valid number ').fadeIn(50).fadeOut(3000);

             }

         }

</script>

<!--sum JS End -->
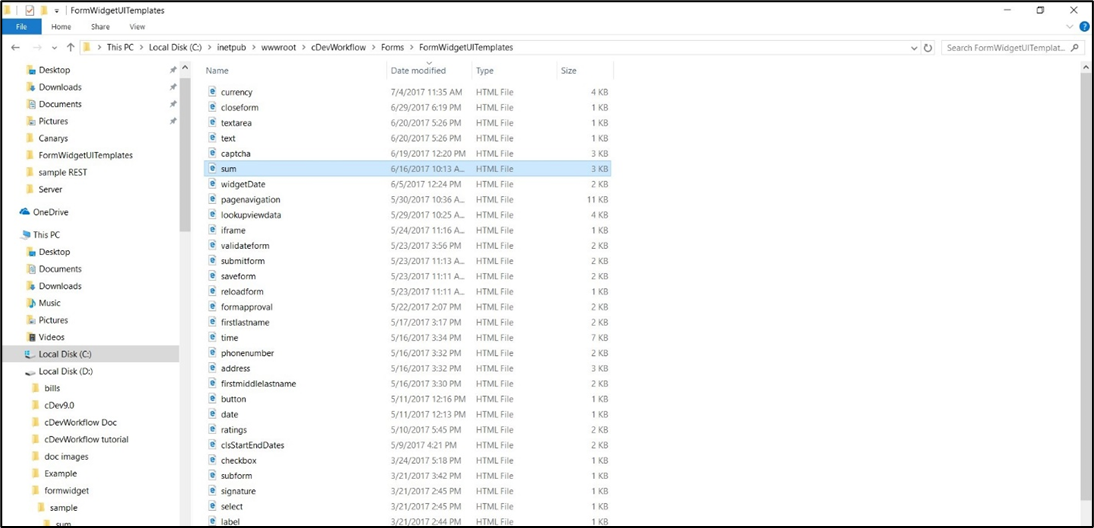
Copy the “sum.html” file to “C:\inetpub\wwwroot\cDevWorkflow\Forms\FormWidgetUITemplates”
3. Server Side DLL
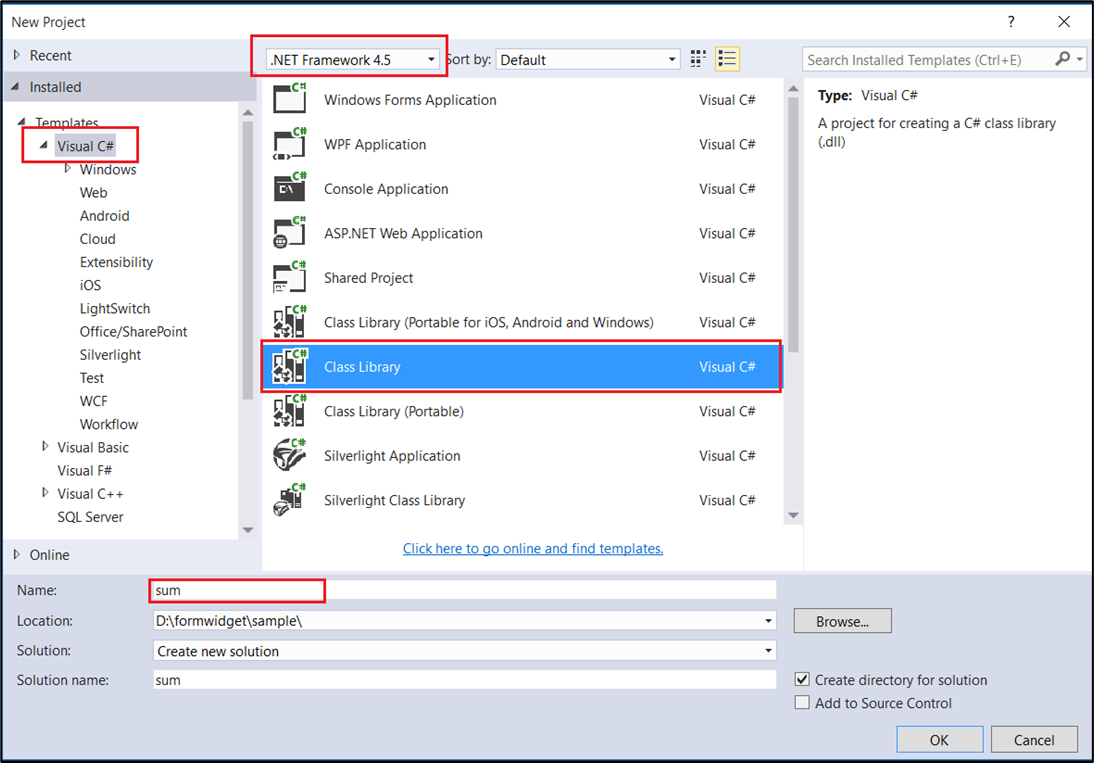
Start Microsoft Visual Studio and select “New Project.” Select “Visual C#” as the language and select “Class Library” as the project type. Also, choose .NET Framework 4.5.2 from the top dropdown. This example will use C# as the development language. This same example can also be written using Visual Basic .NET. Provide the Project name as “sum”.
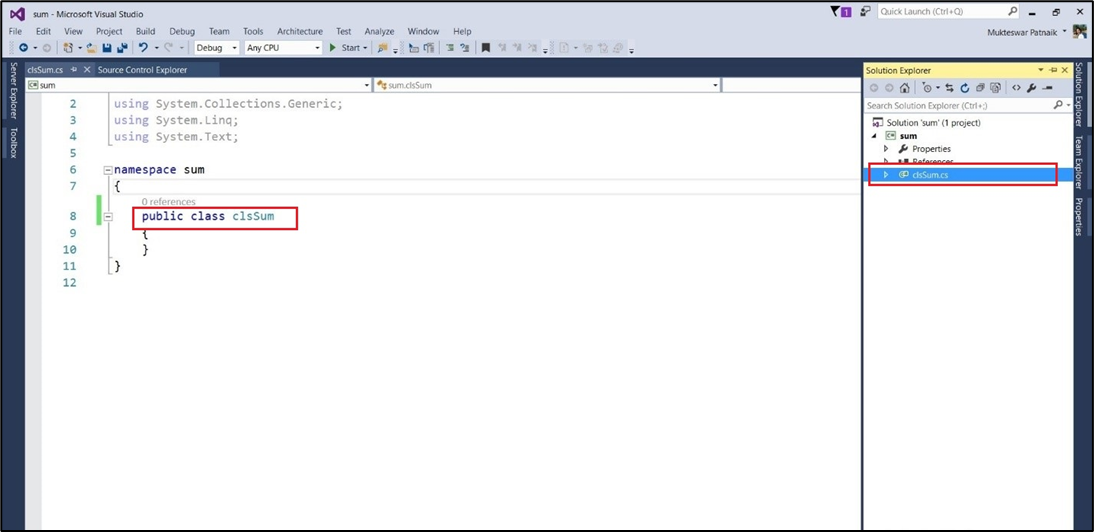
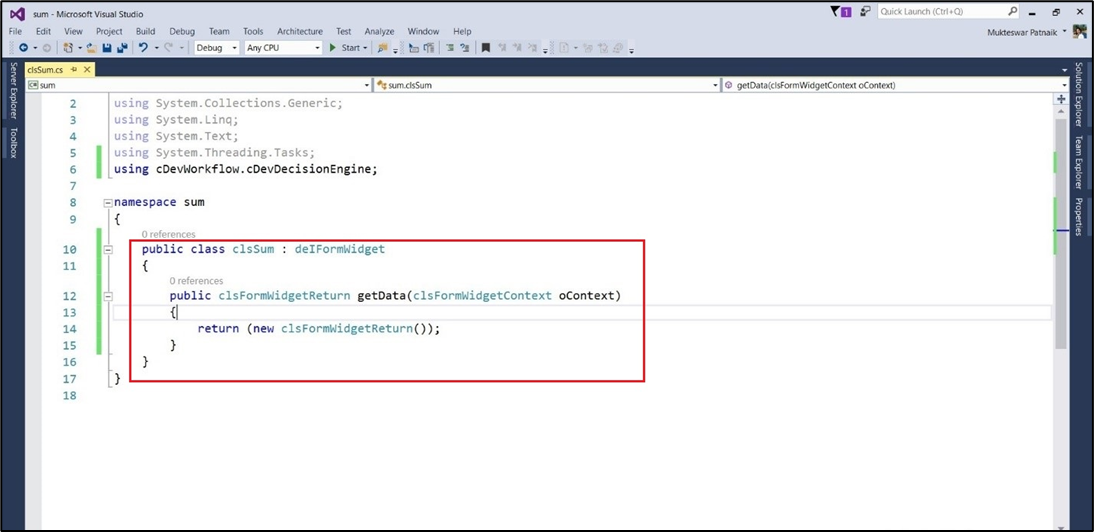
Once the Project is created, rename “Class1.cs” to “clsSum.cs”; it will also automatically change the class name.
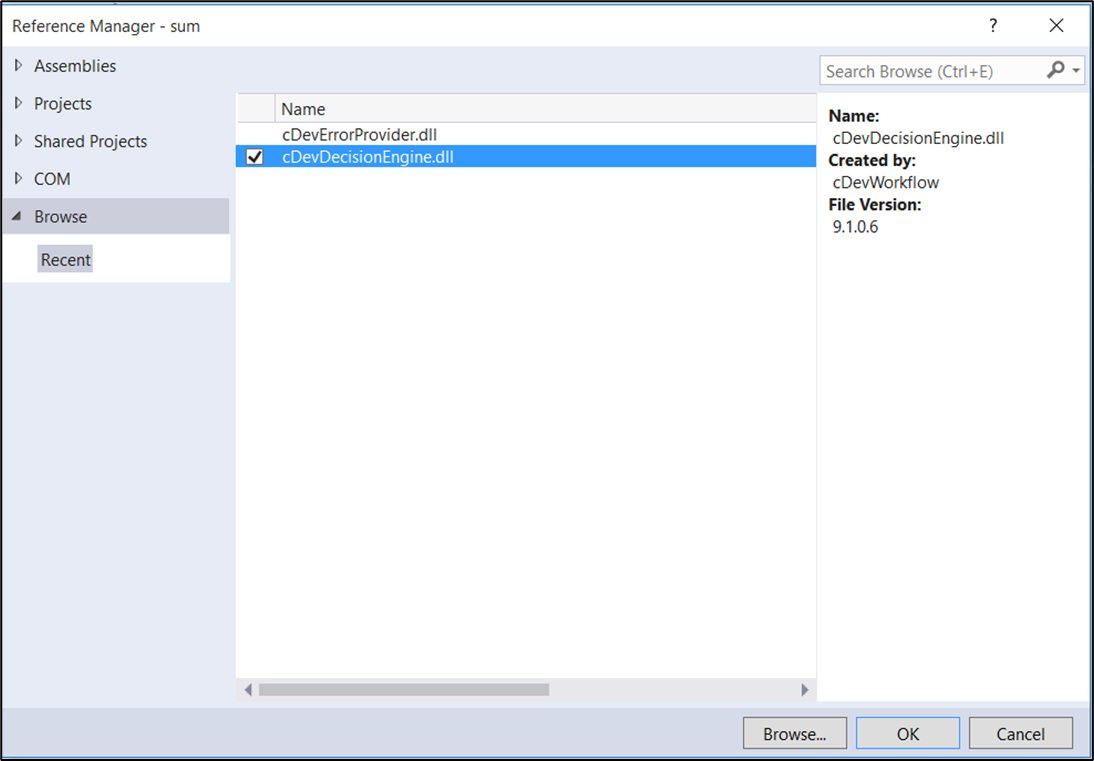
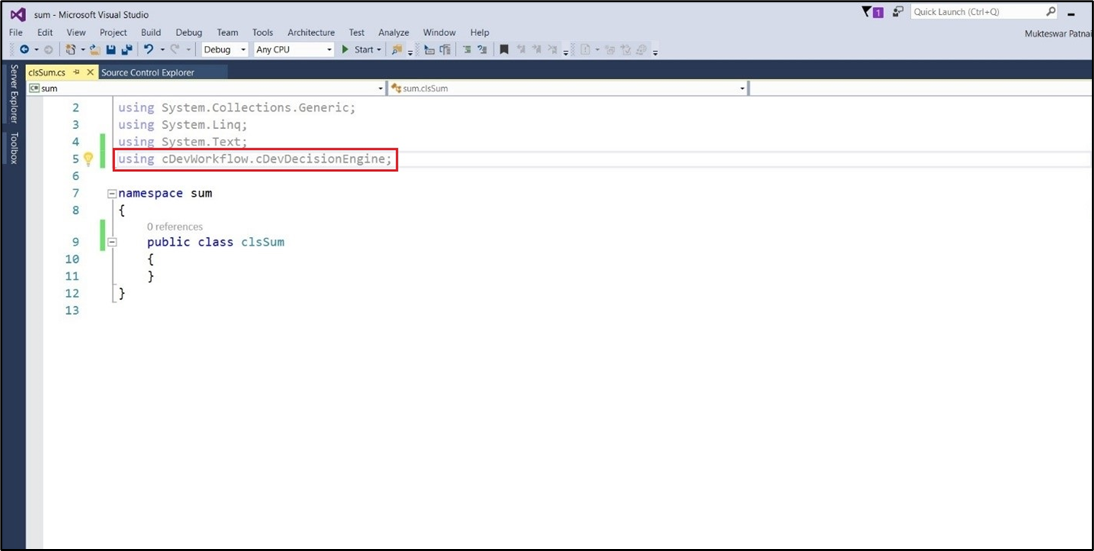
To add a reference to FlowWright, navigate to the following directory: C: inetpubwwwrootcDevWorkflowbin. Select the file cDevDecisionEngine.dll.
Add a “using” statement: cDevWorkflow. cDevDecisionEngine.
Let’s start building the class by implementing the " deIFormWidget interface.” We must implement the “deIFormWidegt.getData” method to implement the interface. Since this widget will not have any server-side operations, it will return an empty object called “clsFormWidgetReturn.”
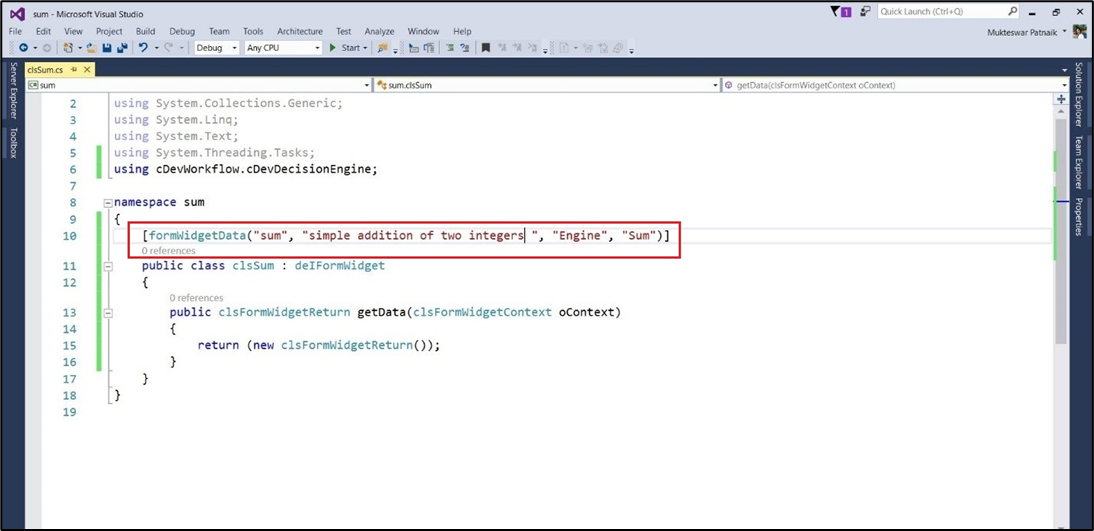
Add the data annotation attribute “formWidgetData” to the class “clsSum” so that FlowWright can auto-configure the Form Widget. The “formWidgetdata” data annotation has four default parameters.
- formWidgetName : This parameter type must be string. The Form Widget name should match the type specified in the Form Widget HTML file, which in this case is “sum.” This parameter value is case-sensitive.
- formWidgetDesc : This parameter type must be a string. The Form Widget description should be a concise summary of the form widget's purpose and features.
- formWidgetCat: This parameter type must be string, and the category should be one of the categories defined in the system for the Form Widget.
- formWidgetDisplayName: This parameter type must be string. The Form Widget display should be the short name for the Form Widget displayed in the Form Widget menu in the Forms Designer.
Now that the Form Widget is complete, compile it to build the DLL.
Navigate to the bin/Debug directory where the DLL was compiled. Select the DLL: “sum.dll.” Right-click on the file, and select “Copy” from the context menu.
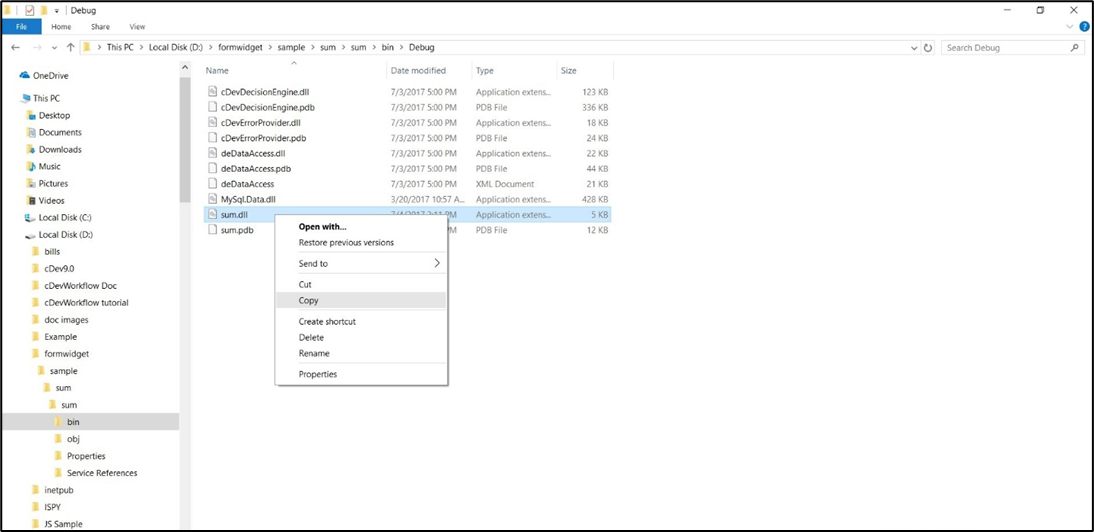
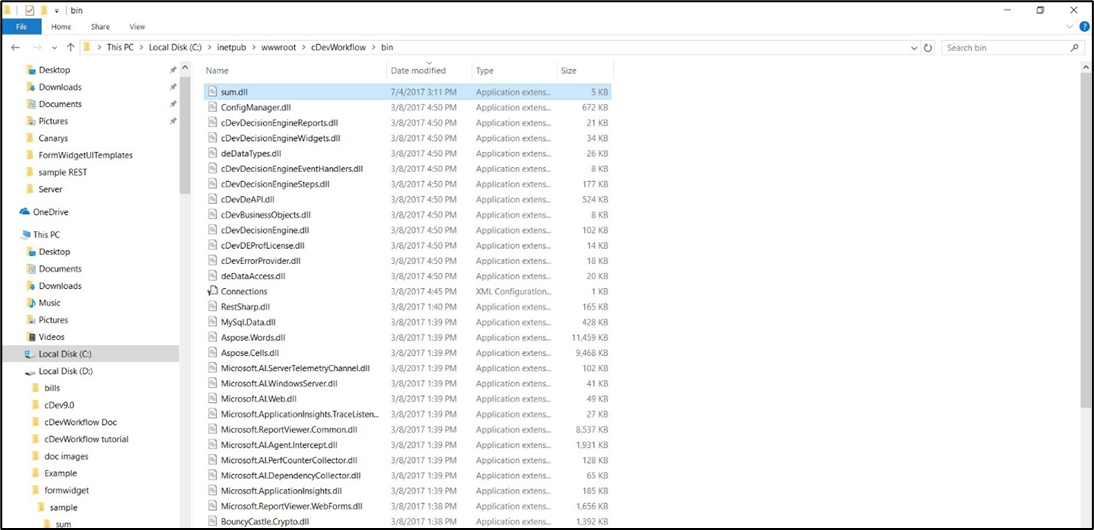
Copy the Form Widget dll to the following directory: “C:\inetpub\wwwroot\cDevWorkflow\bin”.
4. Icon file
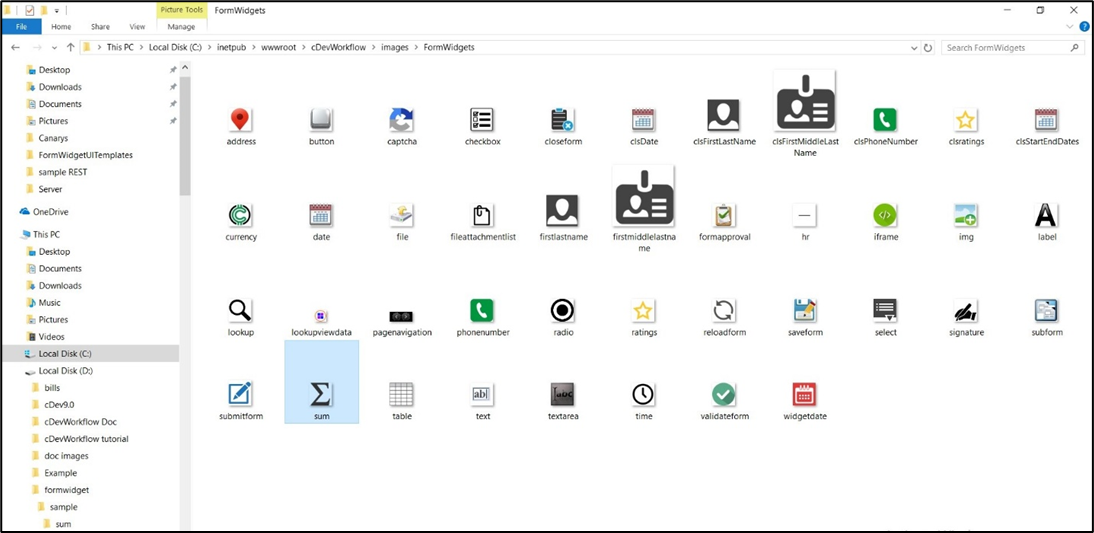
First, let’s set up an icon for the new Form Widget. Create an icon 40 x 40 pixels in size and PNG format. Name the icon like the Form Widget name, “sum.” Copy the file to the following directory: “C: inetpubwwwrootcDevWorkflowimagesFormWidgets.”
5. Configure Form Widget
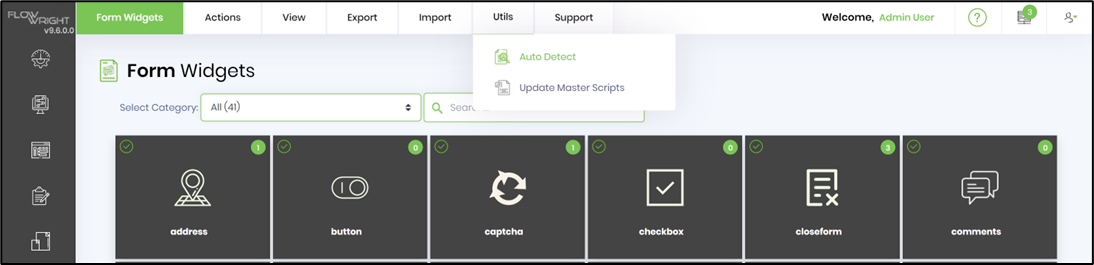
Navigate to the FlowWright Configuration Manager and select the “Form Widgets” menu item. Then, select the “Utils—Auto Detect” menu item.
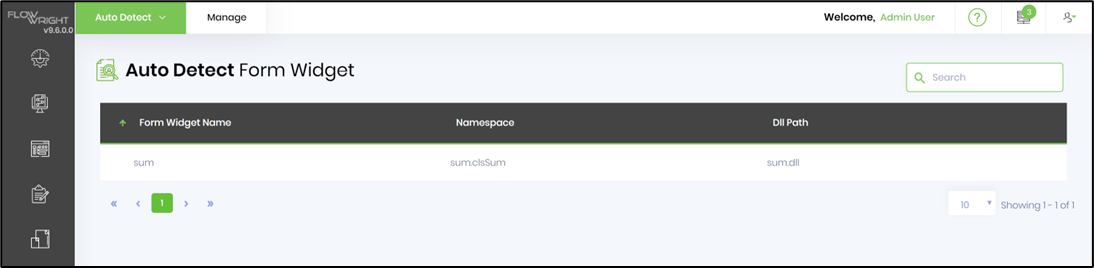
Select the Form widget from the table and select the “Manage - Configure” menu item. The Form widget will be automatically configured within FlowWright.
Once the form widget is successfully configured, select “the Utils - Update Master Scripts” menu item as shown below.

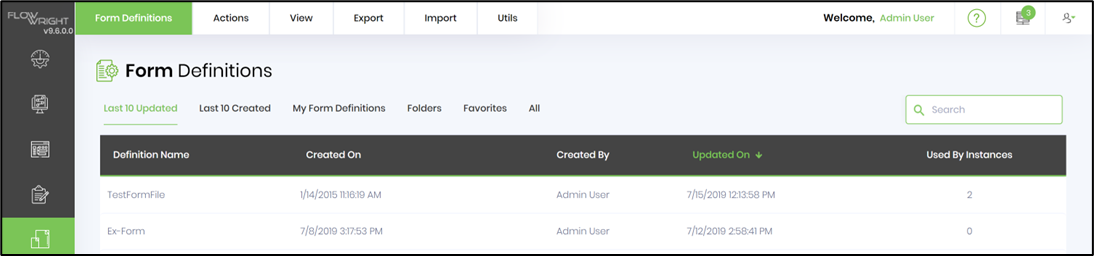
Navigate to the FlowWright Configuration Manager and select the “Forms” menu item.
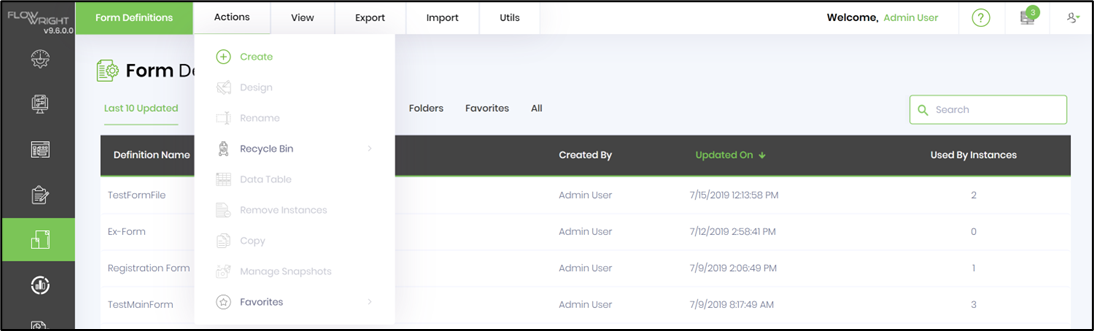
Select the “Actions - Create” menu item.
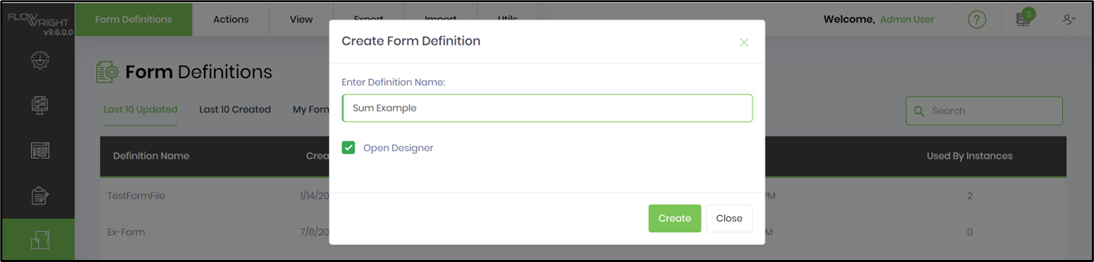
Enter a name for the Form Definition, and click the “Create” button.
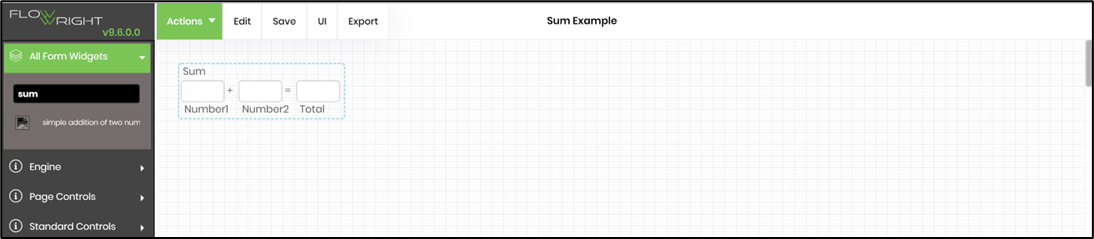
Once the Forms designer is displayed, search for the “sum” form widget within the toolbox. Click and drag the “Sum” Form widget onto the Forms Designer as shown below:
Let’s test the Form widget control, save the Form widget, and select the “UI - Preview” menu item to render the Form:

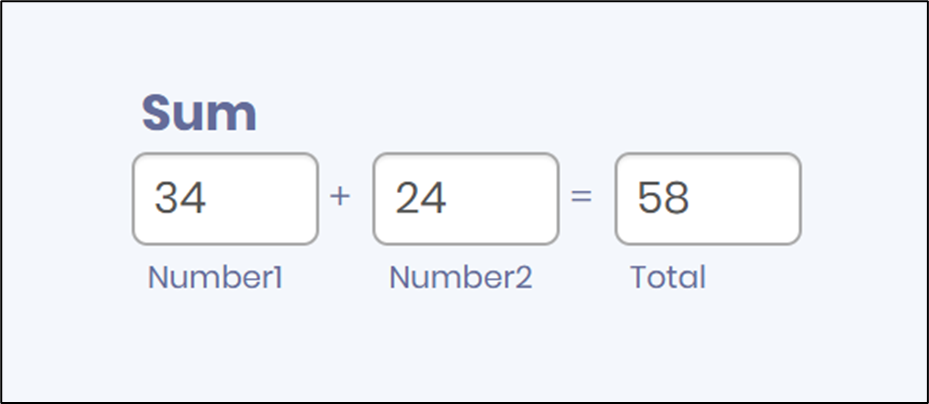
The Form is rendered as follows;
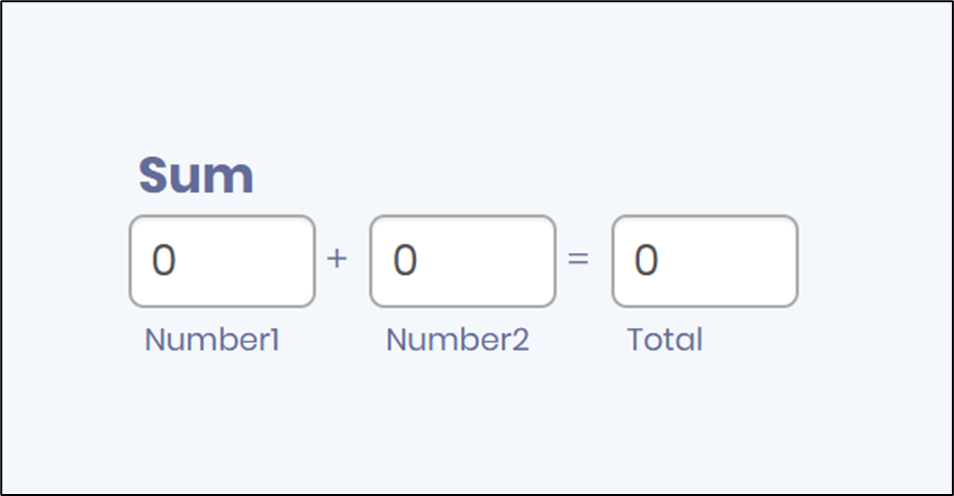
Once rendered, enter numeric values for the “Number 1 and 2” textboxes; it should display the sum of the two numbers within the “Total” textbox.