Description:
The EvaluateDecisions workflow step evaluates multiple configured decisions and returns the first matching value.
The step supports:
- Defining multiple decisions.
- Mapping decisions and their corresponding return values.
- Evaluating the configured decisions.
- Returning the first matching value.
- Storing the resulting value in a Variable or Global variable.
- Continuing the workflow through a ConditionMet return path when a configured condition is matched.
- Following a NoConditionMet return path when no configured condition is matched.
This step evaluates multiple conditions and returns the first matching value. Similar to a “Switch” statement, this step is configured with expressions and return values at design time.
Inputs
- decisions – The decisions property specifies the multiple decisions and their corresponding return values to be evaluated.
- varToStoreResult – The varToStoreResult property specifies the Variable or Global in which the result of the decision evaluation is stored.
Returns
- ConditionMet - The ConditionMet return path can be connected to the next workflow activity when one of the configured decisions is matched
- NoConditionMet – The NoConditionMet return path can be used when none of the configured decisions is matched.
Usage:
The EvaluateDecisions step is typically placed after the workflow collects data and needs to evaluate multiple configured conditions.
The workflow supplies the decision mappings, and EvaluateDecisions evaluates them and stores the resulting value in the specified Variable or Global.
A typical workflow pattern is:
Get Data → Evaluate Decisions → Process Result
The resulting value can then be used by later workflow activities to:
- Determine the next processing stage.
- Select a business processing path.
- Assign a classification or category.
- Determine an approval route.
- Select a notification type.
- Select a processing priority.
- Pass the selected result to another workflow step.
- Handle the case where no configured condition is met.
The step provides two workflow paths:
- ConditionMet → Continue with Matching Result
- NoConditionMet → Handle No Match

Typical Workflow Suggestions:
Evaluate Multiple Business Conditions
Use this step when you need to evaluate several possible conditions and select a corresponding result.
Example:
Get Request Data → Evaluate Decisions → Process Result
The configured decisions determine which result the next workflow activity stores and uses.
Determine Processing Category
Use EvaluateDecisions to determine a category based on workflow data.
Example:
Get Customer Information → Evaluate Decisions → Process Category
The selected decision result can be stored in a Variable or Global and used by subsequent activities.
Determine Approval Routing
Use the step to evaluate configured conditions before selecting an approval process.
Example:
Get Request Details → Evaluate Decisions → Approval Process
A matching decision can provide the result used to determine the subsequent processing path.
The XML confirms that the step evaluates multiple decisions and stores the result, but it does not define the specific business conditions or approval rules you can configure.
Select a Processing Priority
Use EvaluateDecisions to determine a result such as a processing category or priority based on configured decisions.
Example:
Receive Request → Evaluate Decisions → Assign Priority → Process Request
The resulting value can be stored in a Variable or Global for later activities.
Determine Notification Type
Use the step to evaluate configured decisions and determine which type of notification should be generated.
Example:
Process Request → Evaluate Decisions → Generate Notification
The result can identify the notification-related value required by subsequent processing.
Evaluate Multiple Conditions in a Single Step
Use the step when multiple decision rules need to be maintained together rather than creating separate decision activities for each rule.
Example:
Collect Data → Evaluate Decisions → Continue Processing
The XML specifically defines the decisions property as “Enter multiple decisions and returns.”
Use the First Matching Decision
The step is specifically described as returning the first matching value.
Example:
Get Input → Evaluate Decisions → Use Selected Result
This can be useful when several decision rules are configured, and the order of evaluation is significant.
Note: The XML confirms that the step returns the first matching value, but it does not specify the exact evaluation order rules or the decision-expression syntax. Verify how decisions are ordered and evaluated in the FlowWright designer before relying on a particular rule precedence.
Store the Decision Result for Reuse
Use the varToStoreResult property to make the selected result available to multiple subsequent workflow activities.
Example:
Evaluate Decisions → Store Result → Multiple Subsequent Steps
The XML explicitly provides a required Variable/Global destination for the result.
Handle No Matching Condition
Connect the NoConditionMet return path to an appropriate alternate workflow path.
Example:
Evaluate Decisions
ConditionMet → Continue Process
NoConditionMet → Log/Notify → Manual Review
This provides an explicit path for cases where none of the configured decisions are matched.
Route Requests Based on Evaluation Results
Use EvaluateDecisions as a decision point before downstream workflow activities.
Example:
Receive Request → Evaluate Decisions
ConditionMet → Continue Selected Processing
NoConditionMet → Exception Handling
Design the exact downstream routing based on workflow requirements.
Determine a Workflow Processing State
Use the step to evaluate multiple configured decisions and store a resulting state or value.
Example:
Collect Workflow Data → Evaluate Decisions → Update Processing State
The result can be stored in a Variable or Global and reused by subsequent activities.
Prepare a Result for Integration Processing
Use EvaluateDecisions before an integration step when the integration requires a value selected from configured decision rules.
Example:
Get Integration Data → Evaluate Decisions → External Integration
The result Variable or Global can be supplied to the downstream integration activity.
The XML confirms result storage but does not define the requirements of any specific downstream integration.
Use Decision Evaluation Before a Subworkflow
Use the result of the decision evaluation to determine which subsequent workflow activity or subworkflow should execute.
Example:
Evaluate Decisions → Selected Processing → Subworkflow
The ConditionMet and NoConditionMet paths can also be used to distinguish whether any configured condition was matched.
Example:
Let’s build and execute the “evaluateDecisionsDef” example.
- Create a new process definition named “evaluateDecisionsDef” and open it in Designer mode.
- Drag an “updateGlobals, evaluateDecisions, and placeHolder” step to the canvas.
- Connect the dots between the “Start” step and other steps as shown above.
- Select the line between the steps to configure the “Connection Properties”. The default property values are “None, ConditionsMet, NoConditionsMet, Error, and Evaluate”. Depending on the step’s purpose, you can configure additional values.
- Define a variable or a global to store the result.
- Click the "updateGlobals" step to configure its "Required" properties. Provide a name for the step, then click the Save button. Note: Click the "AI Predict" button to have the Copilot add new process steps that match your process description.

- Select the “Optional” tab, then click the Update multiple globals button. A configuration pop-up window appears. Click the Add Row button to insert an empty row. Enter the global name and value, then click the Save button.

- Click the "evaluateDecisions" step to configure its "Required" properties. Provide a name for the step. Click the button to add multiple decisions and returns. Provide a variable or a global to store the result. Click the Save button. Note: Click the "AI Predict" button for Copilot to add new process steps that match your process description.

- Click the button to add multiple decisions and returns. A pop-up window appears for configuration. Click the Add Row button to insert an empty row. Enter the decision and return value. Click the Save button.

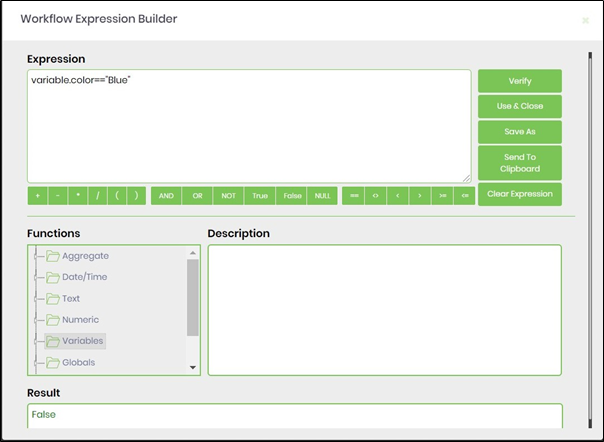
- Click the Decision field. Press Alt+E to open the Expression Builder. This utility lets you create and validate expressions, as shown in the image below. Copy the expression to the clipboard, then paste it into the input field.
- Examples of decisions to evaluate:
(1) Variable.number > 10
(2) Global.testNumber >= 100
(3) "test" == "test"
(4) 1==1
(5) DateTime.Today.ToString()=="04.09.2019 00:00:00"
- The “Logging” configuration is necessary for documentation and also measures workflow progress and percent complete. This is achieved by configuring the step state and percent fields individually, as shown below. Configure the “Logging” using the following properties.

- Save the process definition, create a new instance, and execute it. Render the process instance and click the process step to view its properties. When the workflow reaches the EvaluateDecisions step, FlowWright evaluates the configured decisions. When it finds a matching decision, the step returns the corresponding value and stores the result in the configured Variable or Global. The step is specifically defined to return the first matching value. The workflow then follows either the ConditionMet or NoConditionMet return path.

- The step evaluates the expression and returns the first matching value.

Tips:
- Use meaningful names for Variables or Globals that store decision results.
- Keep decision mappings organized when multiple conditions are configured.
- Define clear and understandable decision rules.
- Test each configured decision with representative input values.
- Test cases where the first decision matches.
- Test cases where a later decision matches.
- Test cases where none of the configured decisions match.
- Verify the result stored in the configured Variable or Global.
- Connect the ConditionMet path to appropriate downstream processing.
- Connect the NoConditionMet path to suitable alternate or exception handling.
- Review the order of configured decisions carefully because the step is defined to return the first matching value.
- Avoid overlapping decision conditions unless you've verified the intended first-match behavior.
- Keep related decision rules together where practical.
- Test changes to decision mappings before deploying the workflow.
- Verify that the expected result is returned for boundary and unusual input values.
- Log decision results when traceability is important.
- Use a dedicated result Variable or Global when the selected value will be reused by multiple downstream activities.
- Test the workflow after changing the order of configured decisions.
- Do not assume the exact comparison operators, expression syntax, evaluation order beyond the documented first-match behavior, or handling of invalid decision expressions unless confirmed by the FlowWright implementation.
- Do not assume that the step itself performs branching based on the stored result; the XML defines the ConditionMet and NoConditionMet workflow return paths, while the selected result is separately stored in a Variable or Global.
- Verify the decision result before using it in downstream integrations or business processing.
Definition Sample:
You may download the sample definition from the link provided and later import it into your FlowWright Process Definition XML file or Form Definition HTML file page.
Note: Verify and complete any missing configuration after importing the sample, including:
- Decision mappings.
- Decision ordering.
- Variable or Global used to store the result.
- Workflow Variable references used by the decision configuration.
- Environment-specific settings, if applicable.
- Downstream ConditionMet and NoConditionMet workflow paths.
- Error or alternate handling.
After verifying the configuration, save the Process Definition before execution.
Click here to download the sample file.