This function enables shareable process collections based on the user's access role.
These collections are created using filters and stored within the application. The process instances are filtered according to the following criteria.
• Based on process definition or definitions
• Based on status: single, multiple, or all.
• Based on a date range: last week, this month, custom dates, or our standard UI date filter.
Navigate to the Process > Collections.

The Process Collections page appears as follows.

Create a process collection.
On the Manage Process Collection page, navigate to the Actions > Create.

A pop-up window is displayed for configuration.

Provide the collection name and description text here.

Select the application role(s) from the drop-down list for access.

Select more than one application role from the list below. In this example, the users of these application roles (All Users, Development, and Finance) can access the MyCollections.

Select the process definitions from the drop-down list below. As a FlowWright administrator, you can fetch the names of all process definitions in the application. The process instances of these definitions shall be grouped in MyCollections.

Select one or more process definitions from the list below. In this example, three process definitions are selected for MyCollections.

Select the process instance status from the list below. By ticking the checkbox, you can choose all statuses (Aborted, Error, ErrorWait, Executing, Completed, Not Started, Reset, Sleeping) or only the ones you need.

In this example, three process instance statuses are selected for the MyCollections process definitions.
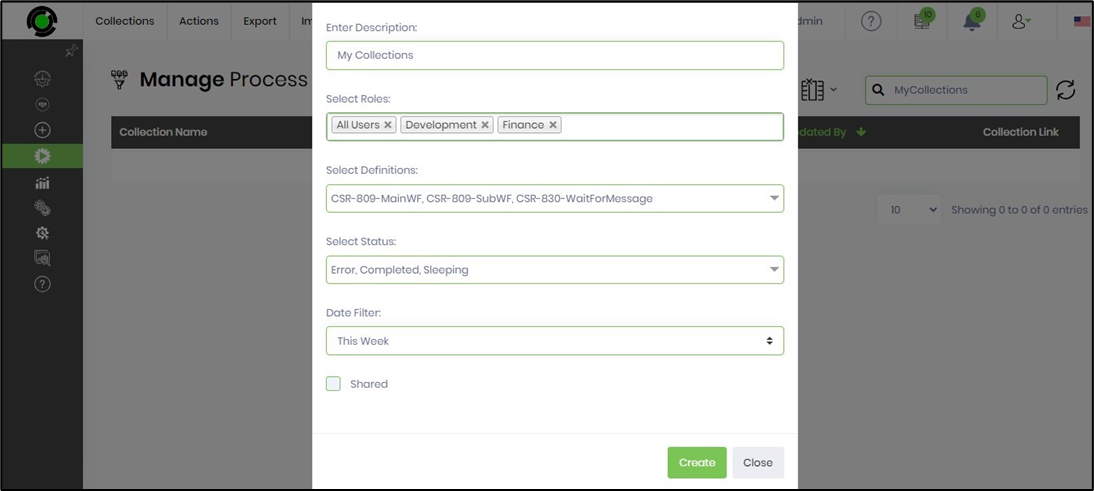
Select the date filter from the list below. The process instances that are generated around the date filter value are considered.

In this example, the process instances generated this month are selected for MyCollections. The owner can mark this process collection as Private by clicking the Shared checkbox. Click on the “Create” button to confirm the configuration.

The process collection is created, and a confirmation message appears in the top-right corner.
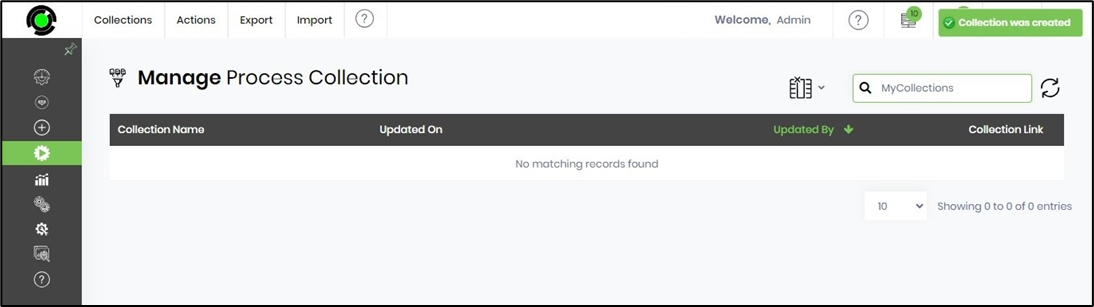
Once collections are created for the Administrator, they appear below with all Actions enabled. You can use the filter designed to view the collections you, the Owner, created. You can view the process collection instances on a new page using the Collection Link.

Note: For non-admin users, collections are displayed in two categories: “Created” and “Shared,” with a toggle to switch between them.

Use the filter Shared to view the collections you shared as the Owner.

View the process collection and its filter criteria.
Select the collection from the Manage Process Collection page list and navigate to the Actions > View.

The table below displays instances associated with the configured process definitions. The created date matches the date filter, and access to the instances depends on the User's application role. Users can select process instances from the list to perform other actions, such as Rendering, Exporting, Importing, and Viewing. Any new instances created on this page are automatically assigned to the process collections group.

Click the red-marked “View Filter” icon to see the criteria.

The collection filter criteria are shown in the pop-up window below for your reference.

Export and import the process collections.
Using the Export and Import functions, you can transfer process collections between FlowWright environments.
Select the collection from the Manage Process Collection list and go to the Export menu option. You can then choose the XML option, which downloads the file to your local folder after exporting.

Select the collection from the Manage Process Collection list and go to the Export menu option. You can choose the SQL option, which downloads the file to the local folder after export.

To understand the file's contents, open the downloaded SQL file with Notepad. The file contains an SQL insert statement that, when run, creates the process collection and its configurations.

On the Manage Process Collection page, select the Import > XML.

Select an XML file from your local folder and click the Update Collection XML button to confirm.

After the import, the process collection becomes available to privileged Users, and a confirmation message appears in the top-right corner. This import function overwrites any existing process collection with the same name.

Edit the process collections.
You can modify the process collection configuration to handle changes such as new process definitions or application roles.
Select the collection from the Manage Process Collection list and go to the Action > Edit.

The configuration pop-up window appears. You can change the collection name or description, add or remove user roles, add or remove process definitions, and more. Click the “Update” button to save your changes.

Copy the process collections.
You can copy the process collection configuration using this function.
Choose the collection from the Manage Process Collection list and go to the Action > Copy.

A pop-up window appears for configuration, as shown below. You need to provide a new process collection name and click the “Copy” button to confirm.

A copy of the selected process collection is created, and a confirmation message appears in the top right corner. Click the Collection Link for the new process collection in the list, and the process instance page will open in a new tab.

Next, click the View Criteria link in the pop-up window to verify the filter setup.

Remove the process collections.
You may remove the process collection configuration if it`s unnecessary.
Select the collection from the Manage Process Collection list, then click the Action > Remove.

A pop-up window appears for confirmation. Click the “Remove” button to confirm.

The process collection configuration is removed from the list, and a confirmation message appears in the top-right corner.
