Description:
Use this feature to define the starting point of a FlowWright process and configure process-level settings that are applied when the process begins. This step is the first step in any process definition. It starts the process execution and configures the DMS file storage folder.
The Start step belongs to the Engine category in FlowWright. Its XML definition identifies the step as start, with the label "Process start step" and the display name "start". It is defined as a Process step with 0 input connections and 2 output connections.
Unlike a conventional processing step, the Start step does not receive an incoming workflow connection. It represents the entry point of the process and provides two outgoing connections for subsequent workflow processing.
The Start step also provides configuration options to initialize and control aspects of the process, including inputs.
Inputs
- Manage variables – define process variables.
- Manage globals – define process globals.
- Manage form variables - define form variables.
- Manage business objects - define business objects.
- Process priority - specify the process instance priority.
- Use single execution iteration - configure single execution iteration behavior.
- Error state process definition - specify a process definition for the error state.
- Abort state process definition - specify a process definition for the abort state.
- Completed state process definition - specify a process definition for the completed state.
- Default process user - specify the default process user.
- DMS Folder - specify a DMS folder.
- DMS File Storage Folder - specify a DMS file storage folder.
Returns
- None - The Start step does not define any return properties
Usage:
The Start step is placed at the beginning of a FlowWright process and serves as the entry point to the workflow.
During process design:
- Place the Start step at the beginning of the process.
- Define process variables, globals, form variables, or business objects when required.
- Configure the process priority when a priority other than the default Medium is required.
- Configure Use single execution iteration when required.
- Configure error, abort, and completed state process definitions when the process requires state-specific handling.
- Specify a Default process user when required.
- Configure DMS folders when the process requires DMS-related configuration.
- Connect the Start step's output connection to the first operational workflow step.
- Save the process definition.
- Create or execute the process and verify that workflow processing begins with the expected configuration.
The XML defines the Start step with no input connections and two output connections, making it the natural entry point for the process.
A typical workflow might look like:

Typical workflow suggestions:
- Process initialization - Use the Start step to define variables, globals, form variables, or business objects required by the workflow.
- Process priority management - Configure Process priority when the process needs a priority other than the default Medium.
- Default user configuration - Use Default process user when the process requires a predefined default process user.
- Error-state handling - Configure the Error state process definition when the process requires a separate process definition for handling an error state.
- Abort-state handling - Configure the Abort state process definition when a separate process definition is required to handle an aborted process.
- Completion-state handling - Configure the Completed state process definition when completion requires a separate process definition.
- DMS process initialization - Configure the DMS Folder and Dms File Storage Folder when the process requires DMS-related folder configuration.
- Single-iteration processing - Use single execution iteration when the process requires this execution configuration.
Example:
Let’s build and execute the “startDef” example.
- Create a new process definition called “startDef" and open it in Designer mode.
- Drag the “Contains, Task, AbortInstance” controls to the canvas.
- Connect the dots between the “Start” step and other steps, as shown above.
- Select the line between the steps to configure the “Connection Properties”. The default property values are “None, True, False, Error, and Evaluate”. Depending on the step’s purpose, additional values are available for configuration.
- Click the "Start" step to configure its "Required" properties. Provide a name for the step, then click Save. Note: Click the "AI Predict" button to have Copilot add new process steps that match your process description.

- Click the "Start" step to configure its "Optional" properties. Click the button to configure variables, globals, form variables, and business objects. Select a priority value (high, medium, or low) from the drop-down list. Select “Yes” to Use a Single Execution Iteration if you want the process instance to retain only the last execution iteration. This is useful when the process instance is designed to loop (n) times to complete the workflow, and only the previous iteration must be retained. By default, the configuration is set to “No,” meaning all iterations are retained. Select the process definition from the drop-down list for the error, abort, and completed workflow status. Click the button to select the “Default process user”. Click the button to select the “DMS file storage folder” or provide the variable/global reference that holds the “FolderID”. Click the “Save” button to confirm.

- Click the button to manage variables. All variables defined earlier in the workflow are listed in the table. Enter the variable name, select the data type from the dropdown list, and click the “Add” button to add new variables to the process. Select the variable name and click the “Remove” button to remove the variable from the process permanently. First, select the variable from the list, then click the “Change Type” button to change the variable's data type.
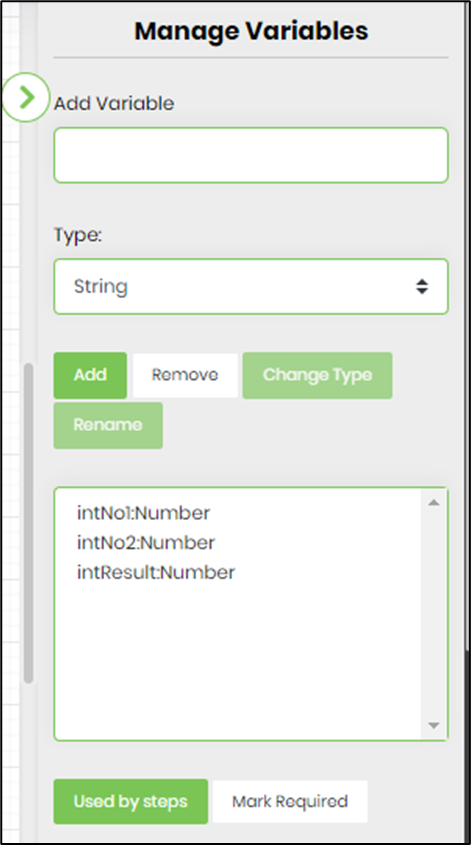
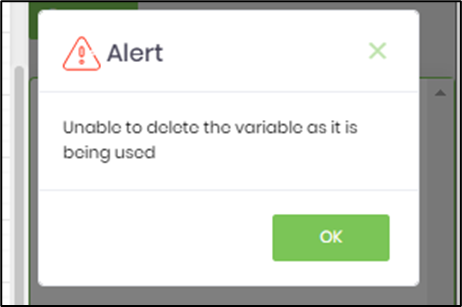
- Select the variable from the list, then click the “Used by steps” button to view all steps that use it. The associated steps are hyperlinked to help track their location when clicked.

- Select the variable, then click the “Mark Required” button to prevent accidental removal. The variable is highlighted in red, and the same button toggles it back to normal.
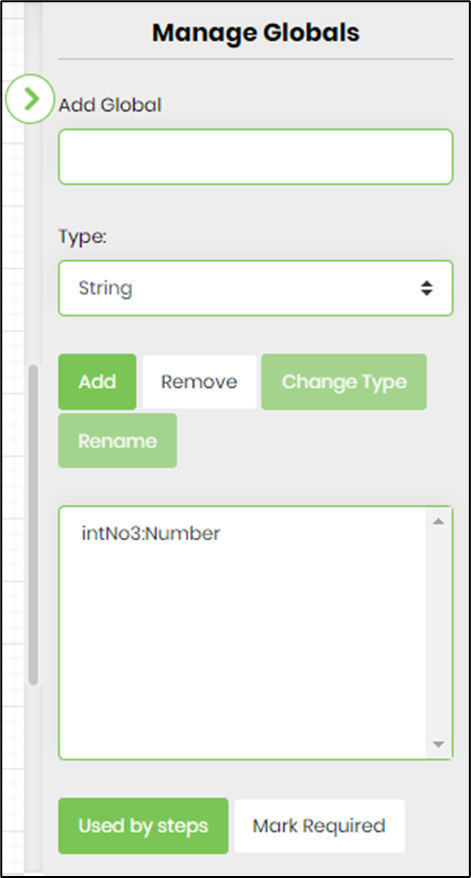
- Click the button to manage globals. All globals defined earlier in the workflow are listed in the table. Provide the global name, select the data type from the dropdown, and click the “Add” button to add a new global to the process. Select the global name, then click the “Remove” button to permanently remove it from the process. First, select the global from the list, then click the “Change Type” button to change its data type. Select the global from the list, then click the “Used by steps” button to view all steps that use it. The associated steps are hyperlinked to help track their location when clicked. Select the global and click the “Mark Required” button to prevent accidental removal. The global is marked in red, and the same button toggles the status back to normal.
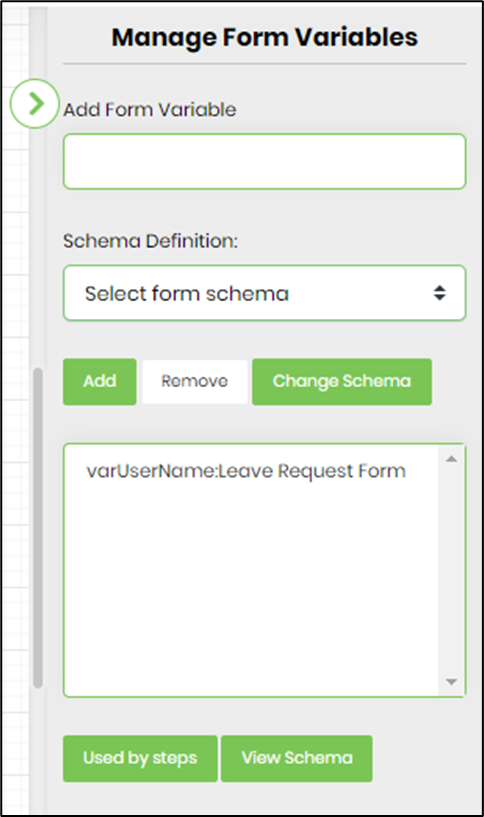
- Click the button to manage form variables. Select the Form Definition from the dropdown list. Enter the variable name, then click “Add” to add a new form variable. Select the variable name from the list, then click “Remove” to permanently remove it. Select the variable name from the list, then click “Change Schema” to map it to another form definition from the dropdown list.
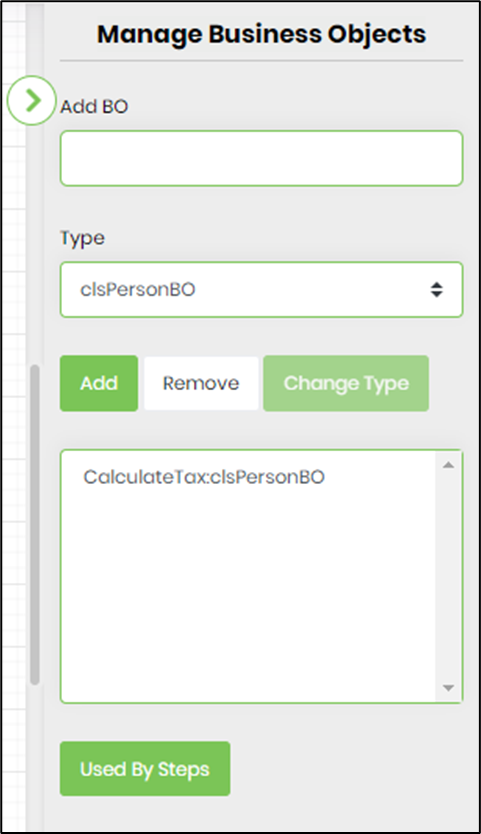
- Click the button to manage business objects (BO). Select the type from the dropdown list. Enter the BO name, then click “Add” to add a new object. Select the BO name from the list, then click “Remove” to permanently remove it. Select the BO name from the list, then click “Change Type” to change the BO type.
- Configure the execution path to follow when the process instance status is 'Abort', 'Errors', or 'Completed'. Use the drop-down list to select an existing process workflow for each status. This configuration is optional, but it can optimize the real-time completion of the process instance.

- Click the button to select the “Default process user”. Use the arrow buttons to navigate and select the user. Alternatively, provide a variable or a global reference that contains the UserID value. The system variable “variable.initiatorID” can also be used. Click the “Save” button. Note: This configuration is optional. When a default user is configured, the application falls back to the default user configuration if it cannot find the user when routing a regular or form task. It later logs errors for invalid or inactive users, handles delegated task ownership, and prevents duplicate task creation per user.

- Click the button to select the “DMS file storage folder”. Navigate to and select the DMS folder. Alternatively, provide a variable or a global reference that contains the FolderID value.
- The following workflow steps use this configuration to store the generated document in the DMS folder rather than in the file system folder. AddFormFileAttachments, ChoiceTask, CheckListTask, GetFileAttachments, WordDocGenerator, Task, RouteForm, and GetTaskFileAttachments.

- Save the process definition, create a new instance, and execute it. Render the process instance. Click the process step to view its properties. The “Start” step should initiate execution as configured.
Use the “AI Predict” feature.
- Click the "Start" step to configure its "Required" properties, then click the "AI Predict" button.
- A pop-up window appears to configure the Copilot's Predict Next Steps feature. Enter the step count to generate. Enter the text description of the context. Then click the “Predict” button.

- The predicted steps are listed below. Use the checkbox to skip unnecessary steps. Click the “Add” button to add the expected list of steps to the existing workflow, branching from the Start step.

- The AI-predicted steps are connected as follows.

Tips:
- Keep the Start step at the beginning of the process.
- Use Manage variables to define variables required by the workflow.
- Use Manage globals to configure values as process globals.
- Use Manage form variables when the process relies on form-related variables.
- Use Manage business objects when business objects are required by the process.
- Review Process priority before deploying processes where execution priority is important.
- Remember that the XML specifies Medium as the default process priority.
- Configure state-specific process definitions only when the process requires separate handling for error, abort, or completion states.
- Configure the Default process user when downstream workflow processing depends on it.
- Configure the DMS folder properties when the workflow requires it.
- Test the process from its Start step through its normal completion path before deploying it.
- Keep the initial configuration at the Start step focused on process-level settings rather than business operations that can be performed by downstream workflow steps.
- Because the supplied XML marks all Start-step properties as optional, configure only those properties required by the particular process.
Notes:
- Category: Engine.
-
Internal name:
start. - Label: Process start step.
- Display name: start.
-
Namespace:
df. -
DLL:
FlowWright.Workflow.dll. - Step definition type: Process.
- Input connections: 0.
- Output connections: 2.
- Manage variables: Optional.
- Manage globals: Optional.
- Manage form variables: Optional.
- Manage business objects: Optional.
- Process priority: Optional; default value is Medium.
- Use single execution iteration: Optional.
- Error state process definition: Optional.
- Abort state process definition: Optional.
- Completed state process definition: Optional.
- Default process user: Optional.
- DMS Folder: Optional.
- DMS File Storage Folder: Optional.
- Returns: No explicit return properties are defined.
-
Variables data type:
defineVariables. -
Globals data type:
defineGlobals. -
Form variables data type:
defineFormVariables. -
Business objects data type:
defineBusinessObjects. -
Process priority data type:
clsInstancePriority. -
Single iteration data type:
checkbox. -
State process-definition data type:
selectDefinitionList. -
Default process user data type:
selectUsers. -
DMS folder data type:
DMSFolder.
Comparison with STOP step:
The Start and Stop steps serve opposite purposes in a FlowWright process: Start initiates workflow execution, while Stop terminates workflow execution.
| Feature | Start | Stop |
|---|---|---|
| Purpose | Defines the beginning of a workflow | Defines the termination/end of a workflow |
| Role in workflow | Entry point | Exit point |
| Typical position | Beginning of the process | End of the process or an early termination branch |
| Execution behavior | Initiates the workflow | Stops further workflow execution |
| Normal use | Every process needs an entry point | Used when a workflow path should terminate |
| Typical flow | Start → Processing → ... |
... → Stop |
| Can have downstream processing? | Yes | No normal downstream processing after termination |
| Typical scenarios | Initialize and begin a process | Complete, cancel, reject, or terminate a process path |
| Business meaning | "Begin this process" | "End this process/path" |
Conceptual difference.
Start
The Start step represents the point at which a FlowWright process begins execution. It establishes the entry point from which the workflow proceeds to its subsequent steps.
A typical workflow is:
Start → Task → Decision → Processing → Stop
Stop
The Stop step represents a termination point. When workflow execution reaches a Stop step, that execution path ends rather than continuing to additional workflow steps.
For example:
Start → Validate Request → Decision
- Valid → Process Request → Stop
- Invalid → Reject Request → Stop
Definition Sample:
You may download the sample definition(s) from the link provided and later import them (drag-and-drop) into your FlowWright Process Definition (XML file) or Form Definition (HTML file) page.
Note: Please verify and complete the import process steps for any missing configurations, including file path references and database connections. Then, save the definition to confirm the changes.