Description:
Route "checkListTask" to users. Task will contain a list of check list items that are user defined.
Inputs
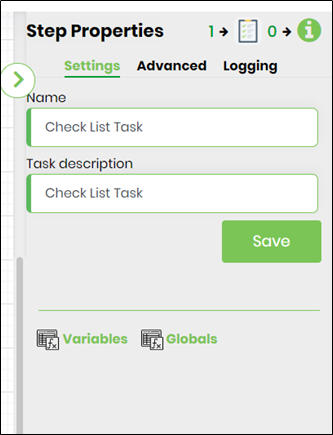
- description – Checklist task description
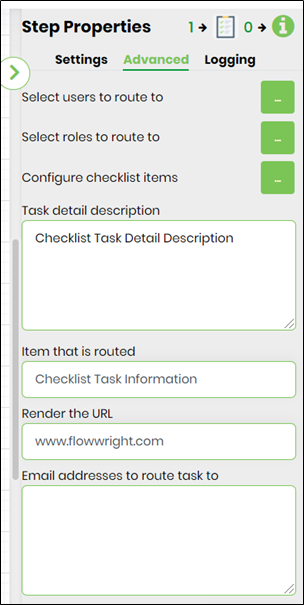
- routeTo – Select the list of users to route the task
- routeToRoles – Select the list of roles to route the task
- checklistitem--Configure checklist items
- taskDesc – Description for the task
- routedItem – Item that is routed
- showURL – URL to render within the task
- emailAddressses- Email addresses to route task to
- priority – Priority of the task
- daysToComplete - # of days, minutes, hours, months to complete the task by
- expireType – Task expire type (days, months, hours, minutes)
- includeWeekends - Include weekends (toggle ON/OFF)
- taskRoutingRules – Task routing rule types (default, task locking, least # of
- tasks in total, least # of tasks in definition)
- taskReminder- Set Task reminder to send reminder mails
- waitForAll – Yes = all users must act on the task, No = requires only 1 user to act on the task (toggle ON/OFF)
- storeRouteToUsers – Variable to store what users the task was routed to
- sendEmailNotifications – Yes = email notification will be sent to each user for the task (toggle ON/OFF)
- fromEmail – Set From email address
- emailSubject – Subject of the email message
- emailBody – Body of the email message
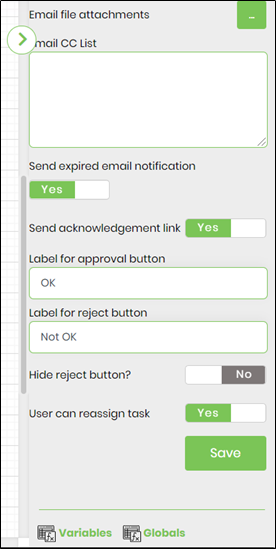
- emailFiles – Set the server path for file attachments
- sendExpireEmail - Send expired email notification (toggle ON/OFF)
- sendAckLink - Send acknowledgement link (toggle ON/OFF)
- approveButtonLabel-- Set text for Approve button label (e.g. Ok)
- rejectButtonLabel-- Set text for Reject button label (e.g. Not Ok)
- sendExpireEmail - Yes = email notification will be sent to each user on task expiry (toggle ON/OFF)
- hideRejectButton--Hide reject button (toggle ON/OFF)
- userCanReAssign – Yes = user can re-assign task to another active users (toggle ON/OFF)
Returns
- completed – task was approved and completed
- rejected – task was rejected
- timeout – task timed out
Step Returns Collection
- stepReturn.routeTo - list of users (GUID), the task is routed to
- stepReturn.completedByUsers – user (GUID), the task completed by
- stepReturn.rejectedUserList – list of users (GUID), the task is rejected by
Usage:

Example:
Let’s build and execute the checklisttaskDef example.
- Create a new definition called “checkListTaskDef”
- Select the definition and click the “design” button
- Drag a "checkListTask" step to the canvas
- Connect the dots between the start and checklisttask step
- Click on the “checklisttask” step to configure its properties
- Define a variable/global to store the routed user list after execution
- Click on the "checkListTask" step to configure its "Settings" properties. Provide a name to the step. Provide a task description.
- Click on the "checkListTask" step to configure its "Advanced" properties. Click on the button to select the users to route to from the list. Click on the button to select application roles to route to from the list. Click on the button to configure the checklist items for the task. Provide task detail description. Provide information on the items that's likely to be routed. Provide the URL link to be rendered when the task is opened by the user. Provide a list of external email address (separated by semi colon).
- Click on the "checkListTask" step to configure its "Advanced" properties. Select the task priority (low, medium, high, normal, urgent). Provide the task completion duration as value. Select task expire type (days, months, hours, minutes). Select if weekends are to be incuded for task completion duration. Select task routing rules (default, task locking, least # of tasks in total, least # of tasks by definition). Select if task should wait for all users to respond. Provide the variable/global reference to store the routed user list. Select if email notification is required. Select from email address if different (other wise uses the mail box configured in the Settings). Provide email subject text. Click on the button to provide the email body text.
- Click on the "checkListTask" step to configure its "Advanced" properties. Provide eMail CC list (separated by semi colon). Select if expired email notification is required. Select if acknowledgement link should be included in the email. Provide user defined labels for approval and reject buttons. Select if reject button to hide. Select if user can reassign the task during run time.
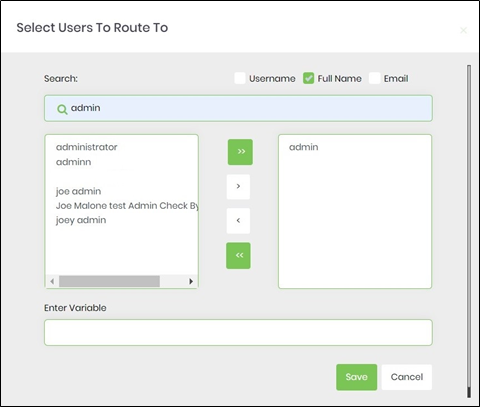
- Click on Select the users to route to and select users or enter variable of userid
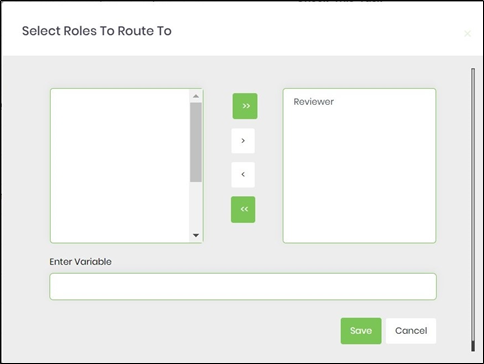
- Click on select roles to route to and select application role
- Click on Task reminder to set task reminder intervals. Enable "Send Email Notification" to ON.Task reminders configured with a positive value is calculated from the task created date. Task reminders configured with a negative value is calculated by reducing that duration from the task due date. The task reminder message body supports line breaks.
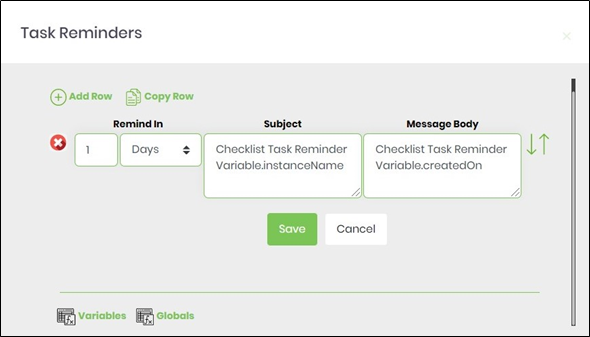
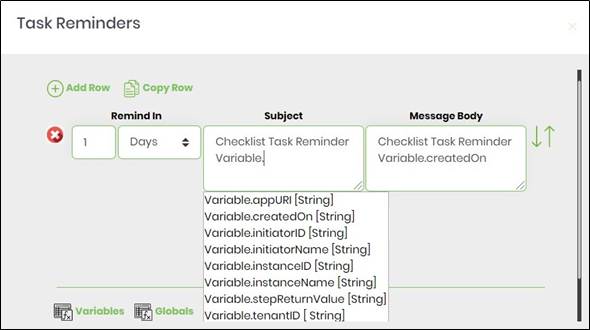
- Use Variable(s) references for more meaningful reminder message.

- Click on Email body and use the existing template (you can edit existing template as well) as email body or create custom template as email body.

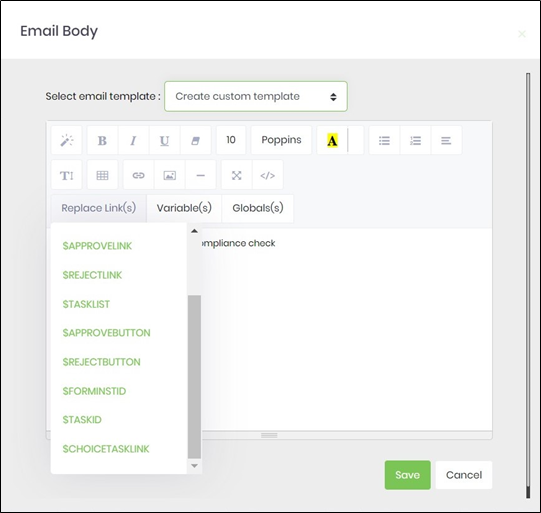
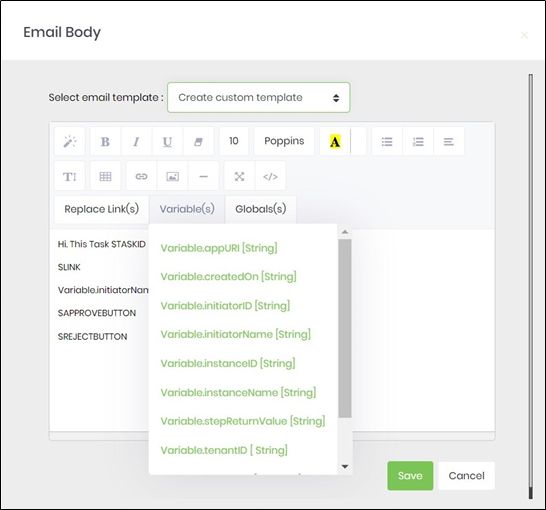
- Click on Replace Link(s) or Variable(s) or Global(s) and select any reference to add more meaningful email message.
- Click on return values to configure return values to the task.

- If the checklist item "Is Required" checked, then while rendering the task, the user has to check it in order to complete the task.
- If "Let user can add custom items" is enabled, then while rendering, user can add custom checklist items to task
- Save the process definition, create a process instance and execute. Check the step properties by rendering the process instance. Step should route checklist task to users.
- The “Logging” setting configuration is necessary for documentation and also measure the workflow progress and the percent complete. This is acheived by configuring the step state and percent fields individually as shown in the images below. Configure the “Logging” using the following properties. The "Send Test Mail" feature is provided to send a test email with the contents configured in the email body, to the current (logged in) user.
