select-widget

Use this widget to display chocies as drop down list.

Last published at: May 9th, 2025

Description:

This widget displays a drop-down list of choices. These choices could be based on a static list, database call, roles, or a lookup list category.


Inputs

  • ID/Name - Name of widget generated by FlowWright (read-only field)
  • Input Size - Select between any of the display sizes (mini, small, medium, large)
  • Data Connection Type - Select between Static, Database, Roles, Lookup
  • Options - Enter the values for the preferred data connection type
  • Display Condition - Define a display condition for other widgets based on the control field value
  • Tool Tip - Enter information to display on mouse hover on form render
  • Styles - Enter the CSS scripts for widget styles
  • Apply Classes - Select between custom classes defined 
  • Save - Save the input values 
  • Delete - Remove this form widget from the designer page 
  • Close - Close the input popup window


Design:


Example:

Let’s build and execute the “SelectWidgetDef” example.  

  • Create a new form definition called “SelectWidgetDef.” 
  • Drag a “Label, Select, Submit” control to the canvas


  • Double-click the SelectWidget to configure the “Settings” properties. Provide a name for the control. Choose the “Data Connection Type” to bind the values to the drop-down list, and set any additional properties necessary to fit your needs. Select “Static” and provide the options in the “value, key” format. The “key” is required to configure conditional display if necessary. You may use the checkbox for mandatory input, hide the form, and mark it read-only during runtime. Select the check box for multiple selection and a type-ahead search feature. Click the Preview button to view the list of items. Click the Save button. Note: Only one data connection type is used during runtime. 


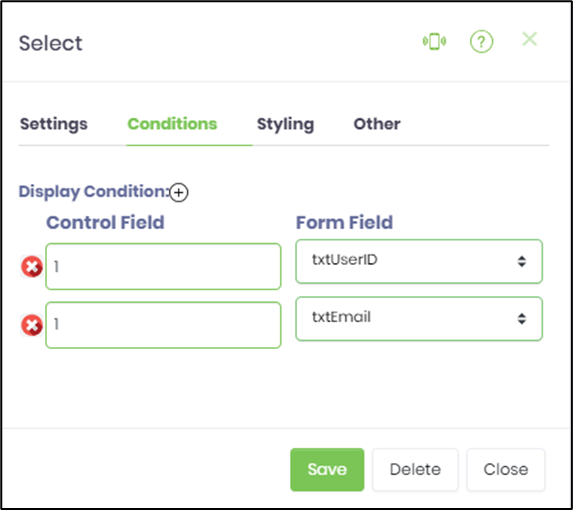
  • Select the “Conditions” tab. Click the plus sign (+) to insert an empty row. Provide the control field value and select the form field to toggle the show and hide behaviour. Click the Save button. You may add multiple display conditions using the plus sign. Note: The control and mapping form field values should be unique for an expected behaviour.  


  • Save the Form definition. Select Actions - Create Form Instance menu option. Generate a new form instance and select the check box to edit this form instance.


  • The form is displayed to the user below. Click the drop-down list to make a selection. 


  • Click the drop-down list to make a selection. The form field remains hidden as the control field (or value) is not selected in this example below. Click the Submit button to complete.  


  • Click the drop-down list to make a selection. The form field is displayed as the control field (or value) is selected in this example below. Click the Submit button to complete.  


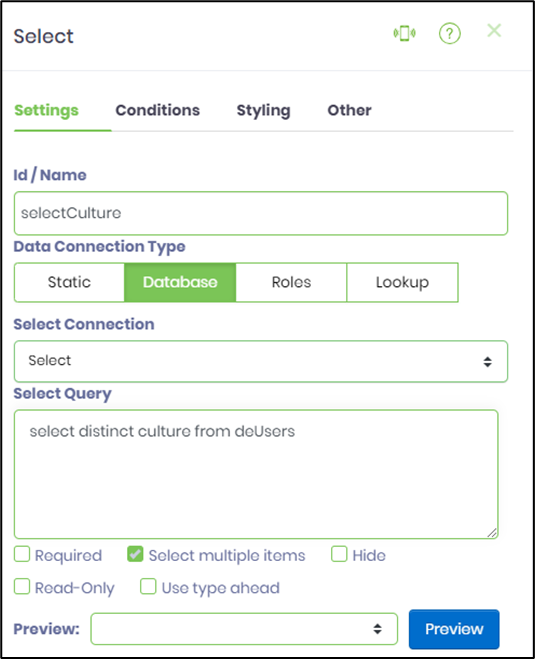
  • Double-click the SelectWidget to configure the “Settings” properties. Provide a name for the control. Choose the “Data Connection Type” to bind the values to the drop-down list, and set any additional properties necessary to fit your needs. Choose the “Database” option and select the connection from the drop-down list. Provide the SQL select statement. You may use the checkbox for mandatory input, hide the form, and mark it read-only during runtime. Select the check box for multiple selection and a type-ahead search feature. Click the Preview button to view the list of items. Click the Save button. Note: Only one data connection type is used during runtime. 


  • Select the “Conditions” tab. Click the plus sign (+) to insert an empty row. Provide the control field value and select the form field to toggle the show and hide behaviour. Click the Save button. You may add multiple display conditions using the plus sign. Note: The control and mapping form field values should be unique for an expected behaviour.  


  • Save the Form definition. Select Actions - Create Form Instance menu option. Generate a new form instance and select the check box to edit this form instance.


  • The form is displayed to the user below. Click the drop-down list to make a selection. 


  • Click the drop-down list to make a selection. The form field remains hidden as the control field (or value) is not selected in this example below. Use the type-ahead feature to search the list. Click the Submit button to complete.  


  • Click the drop-down list to make a selection. The form field is displayed as the control field (or value) is selected in this example below. Click the Submit button to complete.  


  • Double-click the SelectWidget to configure the “Settings” properties. Provide a name for the control. Choose the “Data Connection Type” to bind the values to the drop-down list, and set any additional properties necessary to fit your needs. Choose the “Roles” option and select the role from the drop-down list. You may use the checkbox for mandatory input, hide the form, and mark it read-only during runtime. Select the check box for multiple selection and a type-ahead search feature. Click the Preview button to view the list of items. Click the Save button. Note: Only one data connection type is used during runtime. The roles should be configured before using the Administration - User Management - Roles menu option. 


  • Save the Form definition. Select Actions - Create Form Instance menu option. Generate a new form instance and select the check box to edit this form instance.


  • The form is displayed to the user below. Click the drop-down list to make a selection. Click the Submit button to complete.  


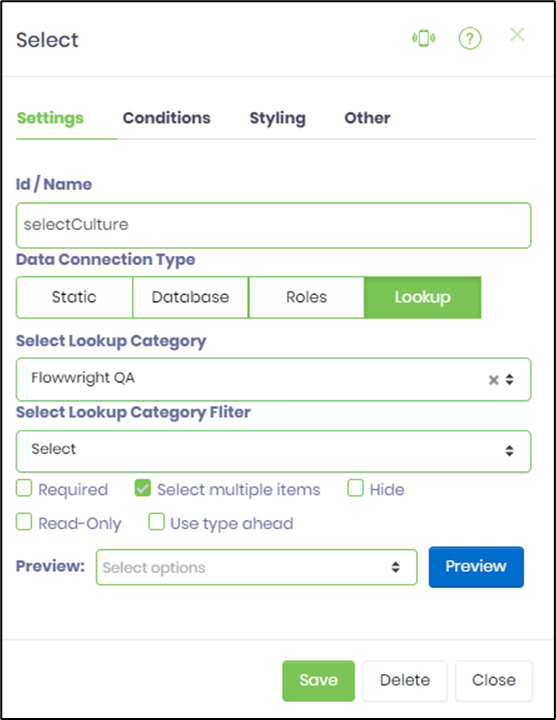
  • Double-click the SelectWidget to configure the “Settings” properties. Provide a name for the control. Choose the “Data Connection Type” to bind the values to the drop-down list, and set any additional properties necessary to fit your needs. Choose the “Lookup” option and select the lookup category from the drop-down list. You may use the checkbox for mandatory input, hide the form, and mark it read-only during runtime. Select the check box for multiple selection and a type-ahead search feature. Click the Preview button to view the list of items. Click the Save button. Note: Only one data connection type is used during runtime. The Lookup values should be configured before using the Manage Config - Lookup Data menu option. 


  • Save the Form definition. Select Actions - Create Form Instance menu option. Generate a new form instance and select the check box to edit this form instance.


  • Click the drop-down list to make a selection. Click the Submit button to complete.  


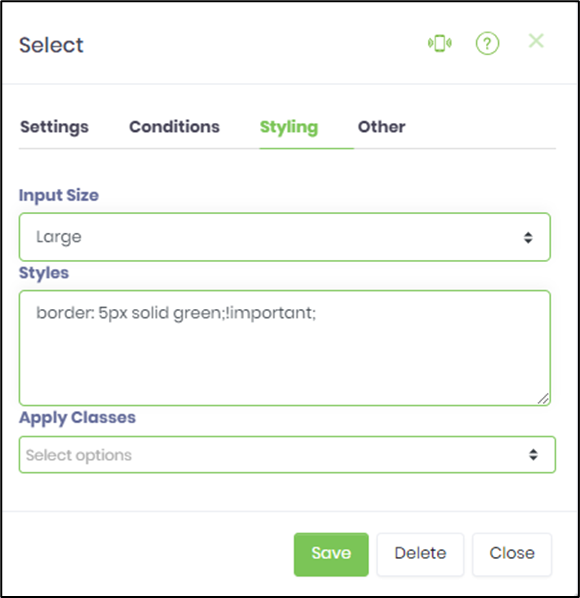
  • Select the “Styling” tab. From the drop-down list, select the text box size. Provide the style script. If the class was previously uploaded, select it from the drop-down list.  
 

  • Select the “Other” tab. Provide the tool tip information. 


  • Select the “Globalize” tab. The list items are translated by selecting the language from the drop-down list and clicking the Translate button. 


  • Note: You may also globalize the form fields using the Page - Globalization menu option. 


Definition Sample:

You may download the sample definition(s) from the link here and later import it (drag-drop) to your FlowWright Process Definition (XML file) or Form Definition (HTML file) page.

NOTE: Please verify and complete the process steps for any missing configurations, such as file path references and database connections after import. Then, save the definition to confirm the changes.

Click here to download the sample file.