Description:
The file widget renders a file attachment control for selecting and uploading files.
Inputs
- ID/Name - Name of widget generated by FlowWright (read-only field)
- Extensions - Enter file extensions as per the reference
- Allow Multiple Files - Select checkbox to upload multiple files (tick mark)
- Max File Size in MB - Enter max file size to restrict the uploaded attachment
- Hide - Select the checkbox to Hide (tick mark)
- Read Only - Select the checkbox to Read-Only (tick mark)
- Show Uploaded File - Select the checkbox to display files uploaded (tick mark)
- Tool Tip - Enter information to display on mouse hover on form render
- Styles - Enter the CSS scripts for widget styles
- Apply Classes - Select between custom classes defined
- Save - Save the input values
- Delete - Remove this form widget from the designer page
- Close - Close the input popup window
Design:

Example:
Let’s build and execute the “FileAttachmentListDef” example.
- Create a Form definition called “FileAttachmentListDef.”
- Drag the “BootstrapGrid, File, FileAttachmentList, and Submit” controls to the canvas and arrange them as shown below.

- Double-click the “File” widget to configure the “Settings” properties. Provide a name for the control. Configure the file extensions accepted for upload. Specify the maximum file size (in MB) for uploads. Select the “Required” checkbox for mandatory input. Select the “Hide” checkbox to hide this widget at runtime. Select the “Read-Only” checkbox to view the list without making a selection. Select the “Allow Multiple items” checkbox to select multiple items from the drop-down list. Select the “Show uploaded file” checkbox to view the selected file list. Select the “Allow download on read-only” checkbox to view files at runtime. Click the Save button.

- Select the “Styling” tab. Enter the CSS syntax. Select the classes to apply from the global drop-down list. Click the Save button.

- Select the “Others” tab. Provide the tool tip text. Click the Save button.

- Select the “Globalize” tab. The application will notify you if there is nothing to globalize, as shown below. Otherwise, select the language from the drop-down list, then click the Translate button. Click the Save button.

- Double-click the “FileAttachmentList” widget to configure the “Settings” properties. The application displays the control name. Select the FileID from the drop-down list. Select the checkbox to show the file's "created datetime" and "created by” information. Select the “Hide” checkbox to hide this widget at runtime. Click the Save button.

- Save the Form definition. Select Actions > Create Form Instance from the menu. Generate a new Form instance and select the check box to edit it.

- The Form is displayed to the user as shown below. Choose the files to upload from the local folder. Use the search text bar to filter the file selection list. Use the red (x) icon to remove a file from the list. Click the Submit button to complete the Form.

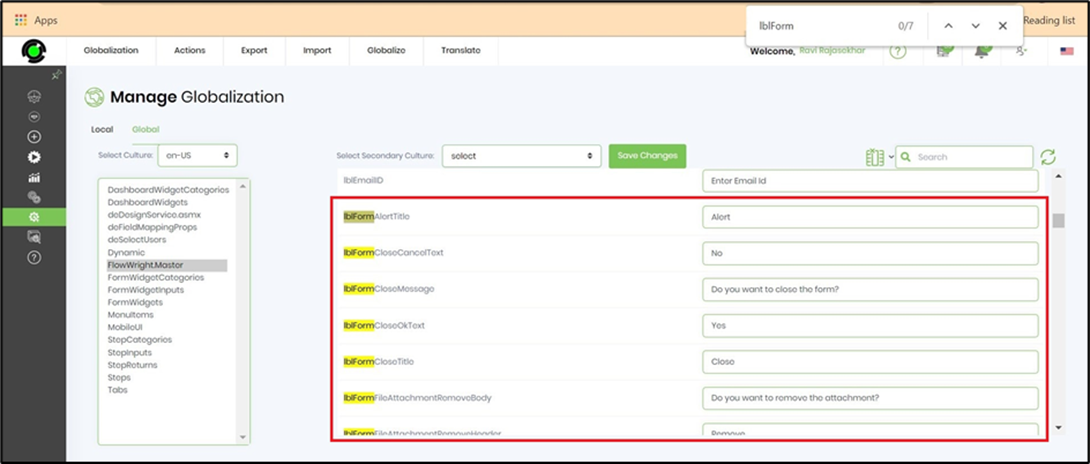
- To globalize the text in the pop-up window, go to Administration > Globalization > Global, then select FlowWright. Select the master culture. Search for the resource ‘lblForm.’ Select the secondary culture. Select the master resource. Navigate to Translate > Azure/Google Translate > Resource. The resource text is now globalized for the selected secondary culture.

Definition Sample:
You may download the sample definition(s) from the link provided and later import them (drag-and-drop) into your FlowWright Process Definition (XML file) or Form Definition (HTML file) page.
Note: Please verify and complete the process steps for any missing configurations, such as file path references and database connections, after the import. Then, save the definition to confirm the changes.
Click here to download the sample file.