Create a new Process Instance.
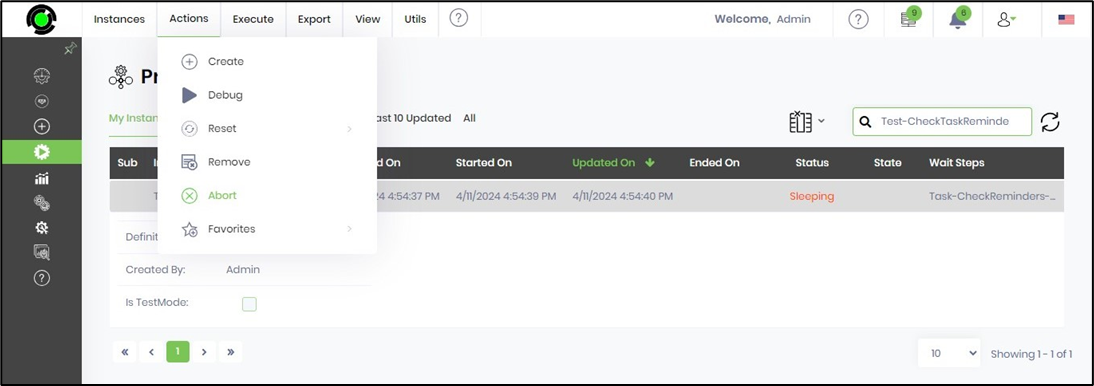
Navigate to the “Process > Instances", select “Actions > Create”.

The Create Instance pop-up window opens for configuration. Select a Process Definition from the drop-down list. Use the buttons to sort the Process Definition list by last modified date or by name. Enter a new Instance name, or click the “Generate” button to create one and insert it into the text box. Check the box to execute the Process Instance after it is created. Check the box to run the Process Instance in Test Mode as a different user. Choose the test mode user from the drop-down list. Click the “Create & Execute” button to continue.

The Process Instance is created, and a confirmation message appears in the top-right corner. The instance status remains “not started” until the FlowWright process engine executes it, even if the service runs automatically. Select the “Execute > Run Engine” menu option to manually start the process engine.

The Process Instance runs, and its status is shown based on the context. Note: All dates and times are stored in the database as UTC and displayed in the user's local time zone. Engine runtime data is in ISO + UTC format.

Items - Documents.
Based on the configuration of the process steps, the workflow definition creates tasks and form tasks, runs subworkflows and dynamic subworkflows, and generates documents to be stored in the DMS folders through its process instances.
The DMS File Storage Folder and its contents, generated by the process instance, are removed when the process instance is “reset, removed, or archived” via the UI.
In this example, the process instance has a completed Task. The Task has a few file attachments uploaded by the User. On the Tasks page, click the Task's “clock” icon to view the Task's history. The file attachments are listed in the table below.

Select the Process Instance and render to view. On the Render Instance page, click “Items > Document”. The process instance navigates to the DMS folder in the new page.

The DMS folder is automatically created by the Process Instance, as configured in the “Start” process step. The folder contains “Tasks, Generated Documents, and Forms” as sub-folders, as the workflow generated these artifacts.

Click to expand “Tasks” and its subfolder. The task file attachments are listed in the table below.

Click to expand “Generated Documents” and its subfolder. The documents generated by the process are listed in the table below.

Click to expand or collapse to view the Document folder path as shown in the image below.

View the Process Instance by status.
On the process instance page, select the “By Status” filter and choose any status from the list. The table will then be filtered accordingly.

The list of process instance statuses is shown below.
| Not Started | The Process Instance is created and not started for execution. |
| Executing | The Process Instance execution is in progress. |
| Sleeping | The Process Instance is waiting for human intervention to continue, or a time delay is in effect. |
| Reset | The Process Instance has been reset manually. |
| Error | The Process Instance has encountered an error and requires manual intervention for resolution. For example, either the step configuration is missing or incorrect, like a file path that does not exist. |
| ErrorWait | The Process Instance has encountered an error and requires manual intervention to resolve it. For example, an error occurred while getting the DB connection string during execution. |
| Completed | The Process Instance has completed successfully. |
| Aborted | The Process Instance has been aborted manually. |
| Debugging | The Process Instance is in “debug” execution mode, which means the execution is controlled by human intervention. |
| DebugEnded | The “debug” Process Instance has completed successfully. |
| AgentTested | The Process Instance has been executed by an “Agent Test.” |
Reset Process Instance.
A process instance in “Sleeping / Error / Aborted” status can be reset to its original state by selecting it from the list and choosing Actions > Reset > Selected. This is helpful after an Instance is executed if the process design changes. A new Instance based on the definition need not be created to retest the Instance.
A process instance can be reset to the start or any prior step within the Instance. This useful feature makes debugging an Instance easier.

Note: All relevant data for the selected instance will be removed from execution. The DMS File Storage Folder and its contents, generated by the process instance, are removed when the process instance is “reset, removed, or archived” via the UI.

Select a Process Instance from the tables, then click “Actions > Reset > To Step” to reset the instance to the selected step.

Choose the preferred option from the pop-up window.

Click the OK button to start the reset process. A confirmation message appears in the top-right corner when the reset is complete.

Remove the Process Instance.
A process instance can be permanently deleted by selecting it from the list and clicking “Remove.”

When an instance is deleted, all related data, including sub-workflows, tasks, and other elements, will also be removed. Note: The DMS File Storage Folder and its contents, generated by the process instance, are removed when the process instance is “reset, removed, or archived” via the UI.

Mark the process instance as a favorite.
Each user can maintain a list of favorite process instances. If you are working on or monitoring a large workflow, you can easily access it by adding it to your favorites.
Add process instance to favorites.
Adding a process instance to favorites adds it to the favorites section.

Remove the process instance from favorites.
Navigate to the Favorites tab.

Select the process instance in the table, then choose 'Favorites' > 'Remove' from the menu.

The process instance is unmarked and moved from Favorites to the All folder. A confirmation message appears in the top-right corner.

Abort process instance.
A workflow instance that is sleeping or waiting can be aborted by selecting it from the list and clicking the “Abort” menu item. The “Abort” menu item is enabled only when the instance is in the “Sleeping” status.
Execute process instance.
This function starts a process instance that has not yet begun. To create process instances for later use, clear the "Execute" checkbox in the "Create Instance" box.
Select the process instance in the table, then choose Execute > Selected.

Click OK to confirm execution of the process instance.

Execute the process instance in Test Mode.
This function starts a process instance that has not yet begun. To create process instances that can be run later, clear the Execute checkbox in the Create Instance box.
From the table, choose the process instance, then select 'Execute > Selected in Test Mode' from the menu.

Click OK to confirm execution of the process instance in test mode.

Select the user from the drop-down menu, then click the “Execute” button to continue.

Execute process instance with input parameters (Generate AI Test Data)
This function provides a UI for entering values into variables and globals before execution.
On the Process Instance page, select the "Execute > With Params" menu option, as shown below.

A user interface for input parameters will be created using the variables defined for the Instance. It might look like this: Enter the variable values, then select 'Execute' or 'Execute in Test mode' as needed. The process instance will run with the provided parameters.

Click the “Generate AI Test Data” button to populate the variables and globals. The process instance will execute with the provided parameters.

Render process instance.
Select the process instance from the list, then click the “View > Render” menu item. The process instance will open in a new tab, showing the workflow from the start step to the current step (for a sleeping status) or to the last step (for a completed status).

Select “Items > Tasks” to view the tasks created by the process instance. The task list appears as a table on the same page.

Select the “Items > Forms” menu option to view the form task created by the process instance. The form task list appears as a table with a clickable link on the same page. The list also includes forms from sub-workflows.

Search within the process instance for tasks, steps, forms, and reports by name. Enter the search term in the Search textbox, then press Enter. Results will appear in a pop-up window as clickable links. Click a result to align the background workflow with it.

Navigate to “Items > Variables > Select” the Start or Latest variables menu option to search for variables by name in the rendered process instance.

A pop-up window displays the list of variables and their values during the “Start” event.

Use the “Search” textbox to find variables and globals.

Navigate to “Items > Variables”. Select Change Tracking to monitor changes to variables in the process instance.

Select the variable from the dropdown menu to view the changes, including the date and time stamp.
